
- Forum
- The Workshop
- FAQ's, How-To's & Part Numbers Listing
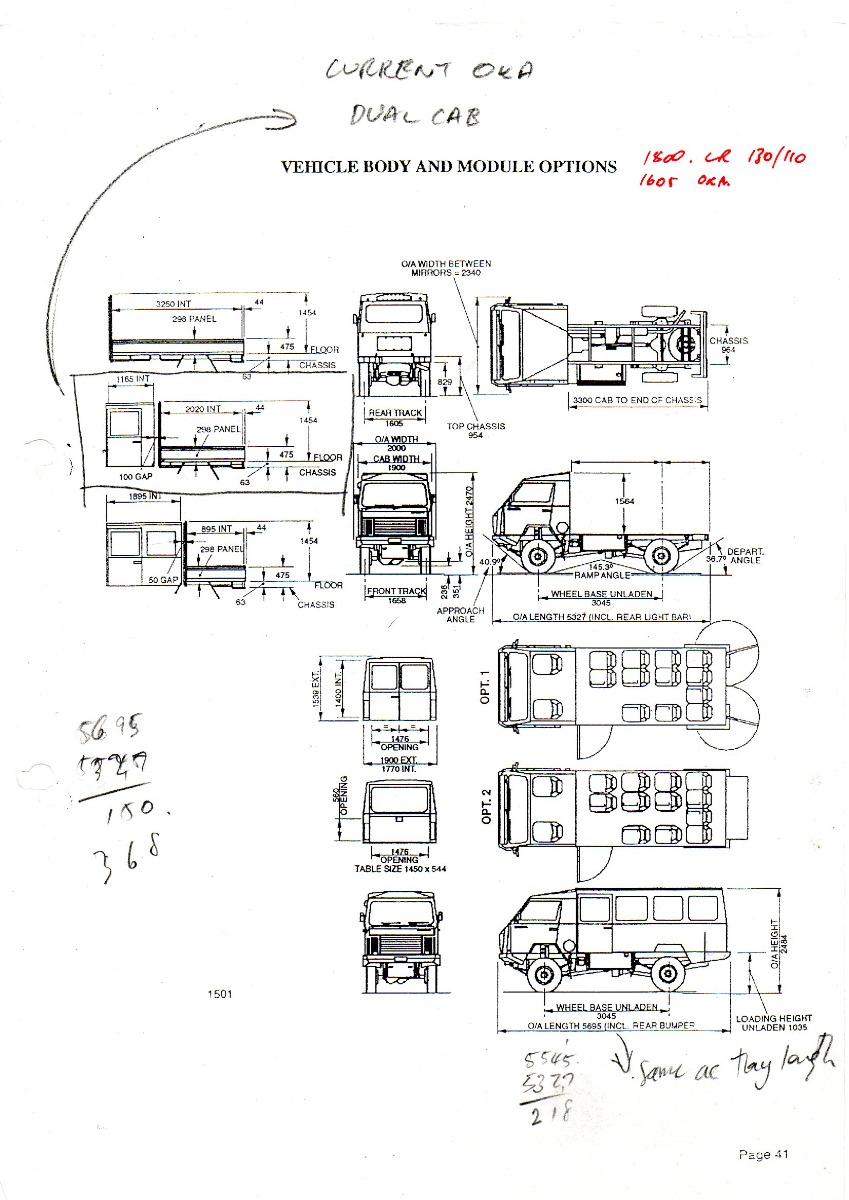
- Does anyone have the original camper body and pop-top dimensions/drawings?
Does anyone have the original camper body and pop-top dimensions/drawings?
- Peter_n_Margaret
-

- Offline
- Posts: 910
Second best decision was to make it a bed-over-cab. The floor of the N-S bed is the lowest part of the cab roof. This opens up the rest of the living area which changes everything for the better. My biggest beef with most OKA campers is that they are claustrophobic.
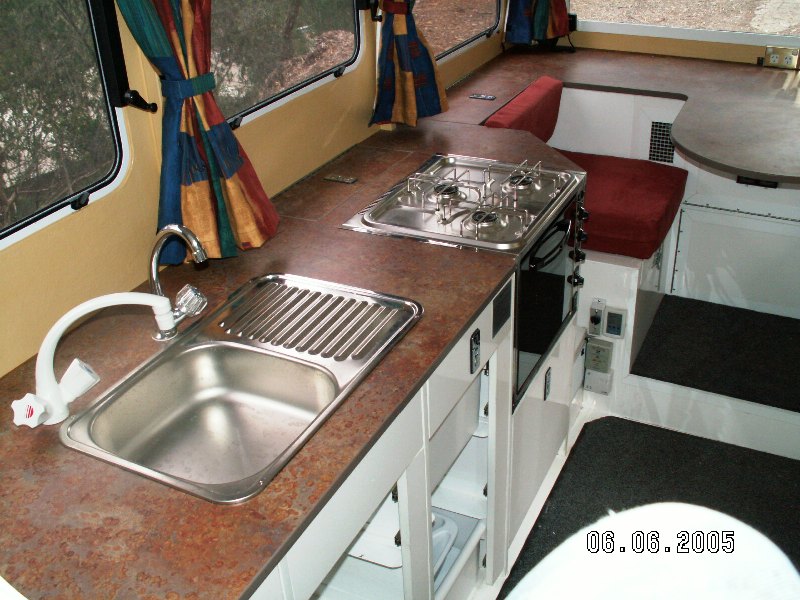
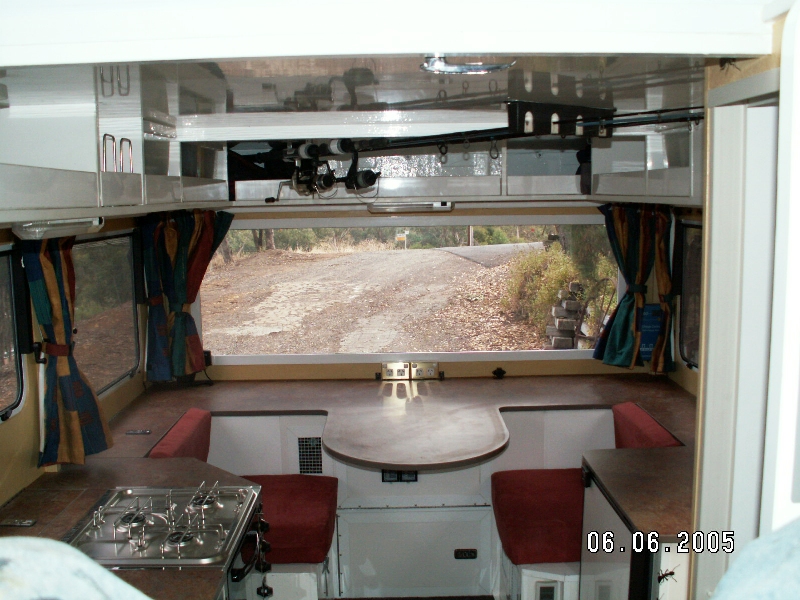
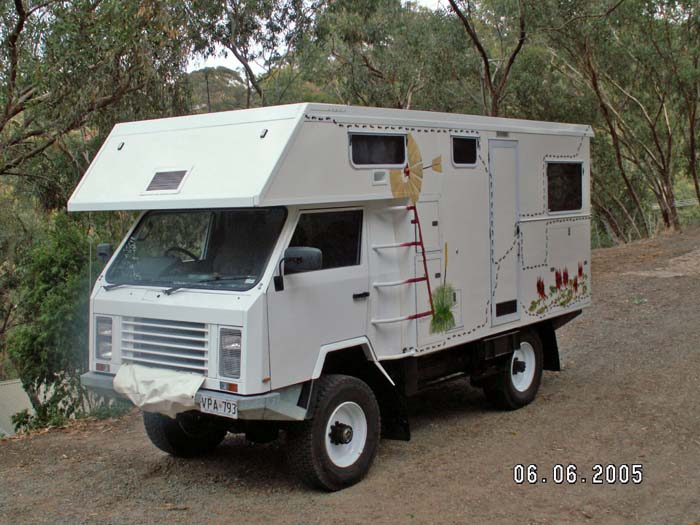
I am currently building a light weight version from #077, using 20 years of experience with #196 as a starting point.
Not a lot is changing.
The bed moves forward a tad, and the pop-top over the bed goes and it gets a slightly higher fixed roof.
The shower/toilet is a tad bigger and moves from FL to FR.
The box is Vanglass with no frame. Furniture is very lightweight material and becomes part of the structural integrity of the body. All window glazing is polycarbonate (scratch resistant).
There will be no gas and over 2kW of light weight solar. Alloy wheels and 37x12.5R17 tyres. All fuel and water tanks are rotomoulded HDPE.
Happy to post pics or answer questions.
Cheers,
Peter
Cheers, Peter.
OKA196 motorhome built 2004/5, tinyurl.com/OKA196xtMotorhome
OKA 077 lightweight motorhome under construction.
Mob.0428171214
Please Log in or Create an account to join the conversation.
- Peter_n_Margaret
-
- Offline
- Posts: 910
Cheers,
Peter
Cheers, Peter.
OKA196 motorhome built 2004/5, tinyurl.com/OKA196xtMotorhome
OKA 077 lightweight motorhome under construction.
Mob.0428171214
Please Log in or Create an account to join the conversation.
- mat-with-one-t
-
 Topic Author
- Offline
- Posts: 43
We live outside mostly, so trying to figure out how an outdoor kitchen would work (at the right height). Shower would be outside. Maybe a toilet that can move in/outside where needed.
I'd be really interested to see pics and perhaps get a list of materials used? I am aiming to keep it as light as possible.
Great! Mat
Please Log in or Create an account to join the conversation.
- Peter_n_Margaret
-
- Offline
- Posts: 910
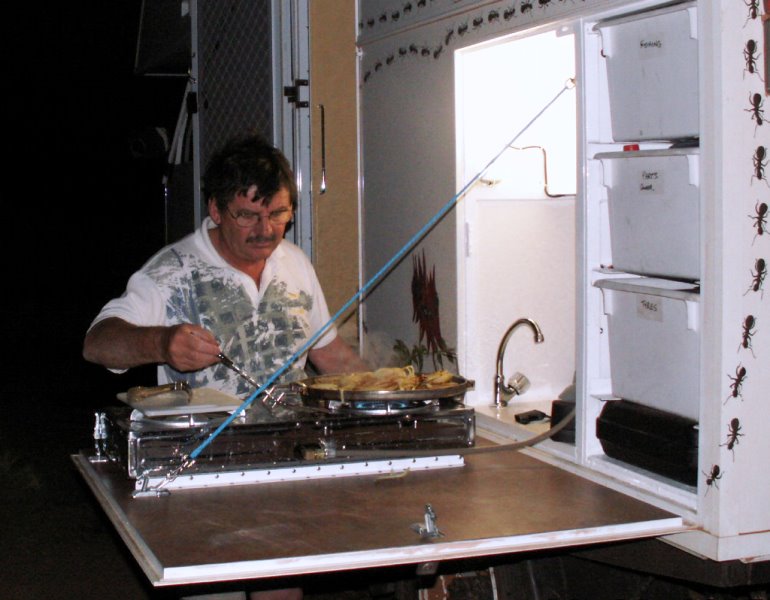
No sink, but that would be doable too.
Got to go... back tonight....give me a list of specific questions....
Cheers,
Peter
Cheers, Peter.
OKA196 motorhome built 2004/5, tinyurl.com/OKA196xtMotorhome
OKA 077 lightweight motorhome under construction.
Mob.0428171214
Please Log in or Create an account to join the conversation.
- Peter and Sandra OKA 374
-

- Offline
- Posts: 1397
There would have been others that were built on cab chassis by various mobs over the years and plenty converted by owners.
OKA 374 LT Van, converted to camper/motorhome,
400ah Lithiums, 1100w solar, diesel cooking heating and HWS,
Cummins 6BT, Allison 6 speed auto, Nissan transfer.
Please Log in or Create an account to join the conversation.
- mat-with-one-t
-
Topic Author
- Offline
- Posts: 43
- how did you approach getting the main shell built with Vanglass panels? That is, did you draw on CAD/other, and have them flat-pack deliver a body, or did they build it for you?
- how have you attached the (frameless) body to the cab?
- What materials did you choose for kitchen/benches/shower/other? What were your priorities when choosing?
- who supplied the windows, and were they standard sizes or made to order?
- what have you chosen for heating and cooling, and where are they mounted?
Hope all that is ok to ask!!??
All the best, Mat
Please Log in or Create an account to join the conversation.
- Peter_n_Margaret
-
- Offline
- Posts: 910
- how did you approach getting the main shell built with Vanglass panels? That is, did you draw on CAD/other, and have them flat-pack deliver a body, or did they build it for you?
Both vehicles I bought ex factory sheets and cut them myself. Drawing them up on CAD first would probably be better. #196 panels were shipped by truck flat packed.
#077 we were doing a trip up there anyway, so I built a frame for our trailer and picked them up ourselves (along with a spare Perkins). The panels were simply cut to length. Only problem was we ran into Covid and I did not want the panels full of dirt, and going through NSW was not possible, so we had a long trip via Mt Isa to get back to Adelaide on the bitumen.
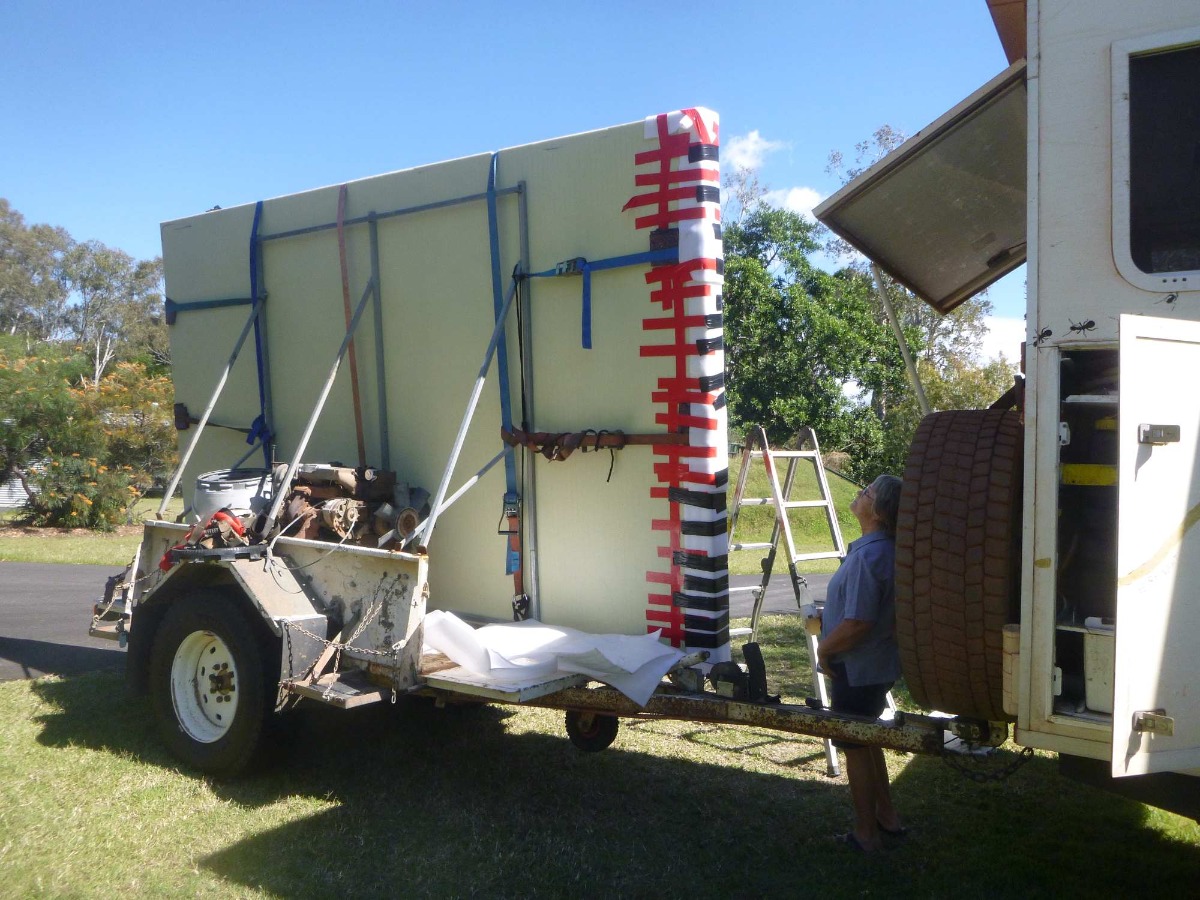
Shaun at Vanglass is great to deal with he will do as little or as much as you want to pay for. I left the trailer there for several months while we went to the Coburg Peninsula.
- how have you attached the (frameless) body to the cab?
With #196, the box (with frame) was on a steel sub frame. That was mounted to the chassis using standard OKA body mounts (12 from memory). I did shift the back 2 from the bus position over the cross member to the chassis rails.
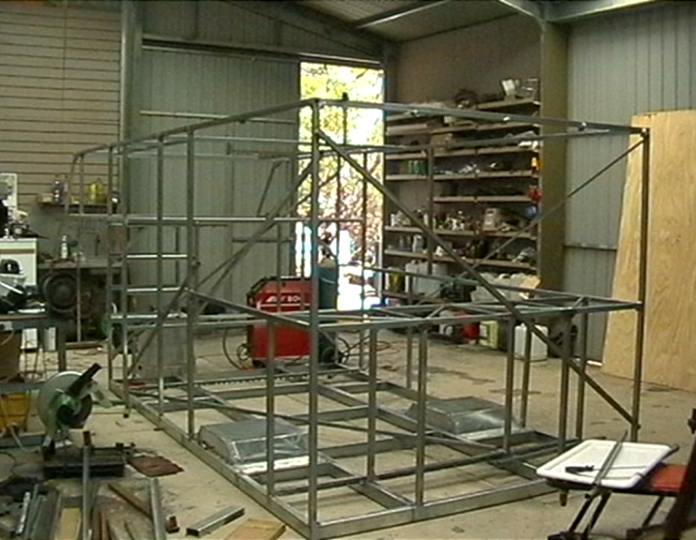
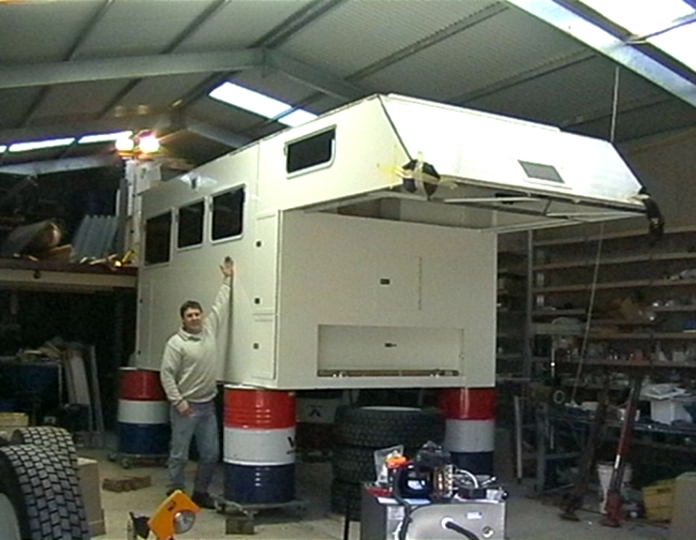
With #077, I have been much more radical (with my engineer's support).
Tanks and most plumbing and some wiring in first. It is accessible later, but easier before the floor goes in.
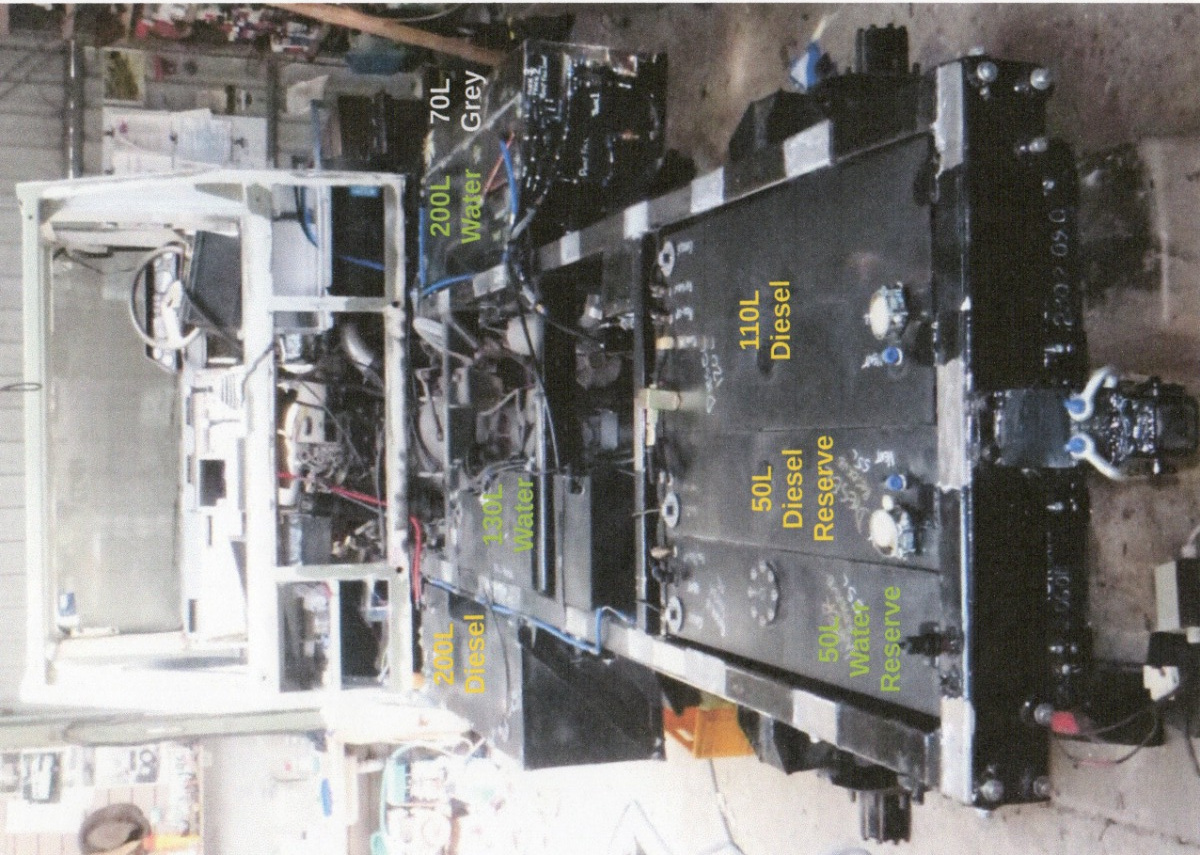
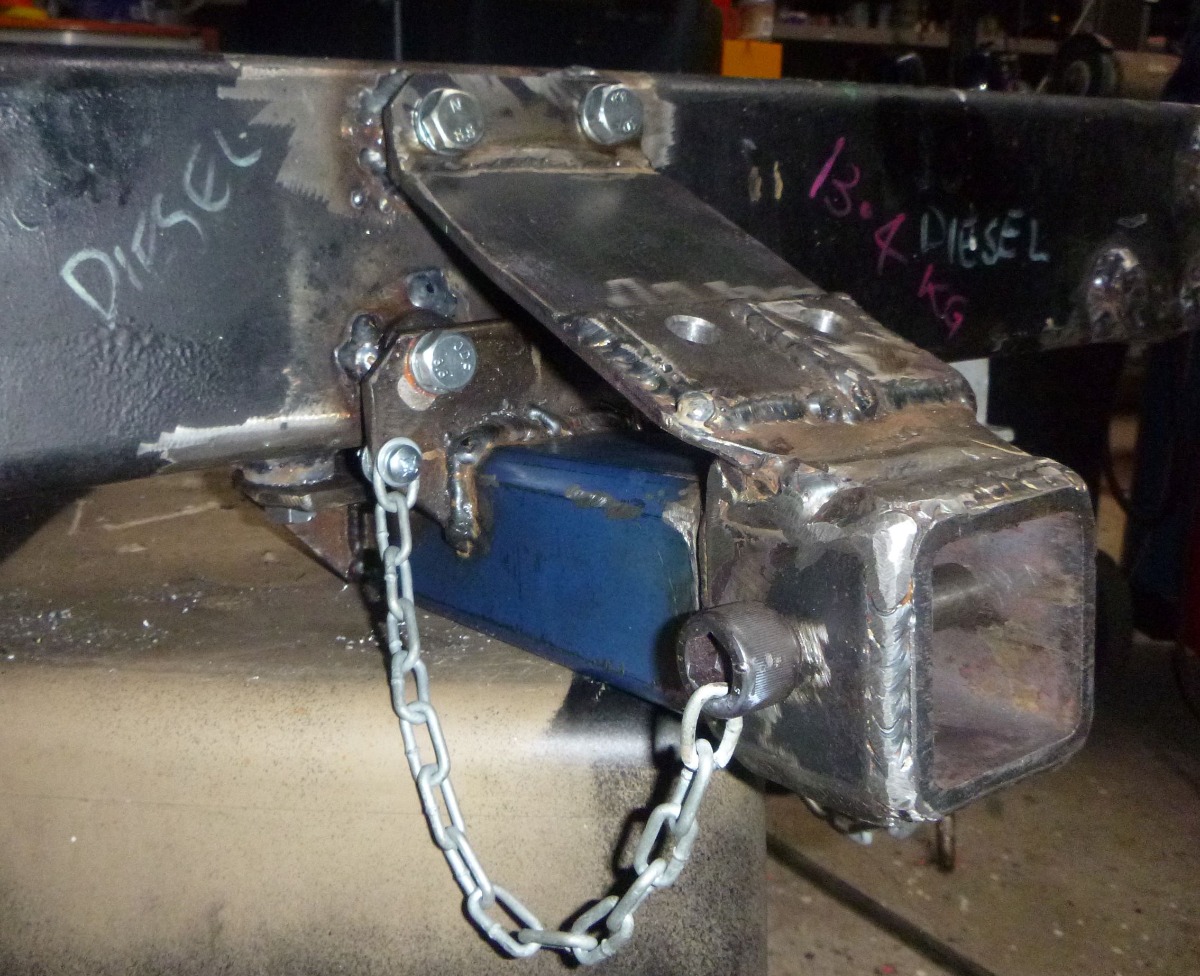
I moved the rear cross member back about 300mm. This gets it closer to the rear wall of the box for better support and to give better space for rear tanks and to make the tow bar short and light (rated to 3.5T).
The rear cross member also becomes a compressed air receiver (only approved to 80psi because of the shape).
The white spots (pic above) on the chassis are raw metal where the 25mm thick polyurethane support blocks are glued.
On top of the polyurethane blocks are glued some aluminium tube cross members and short supports.
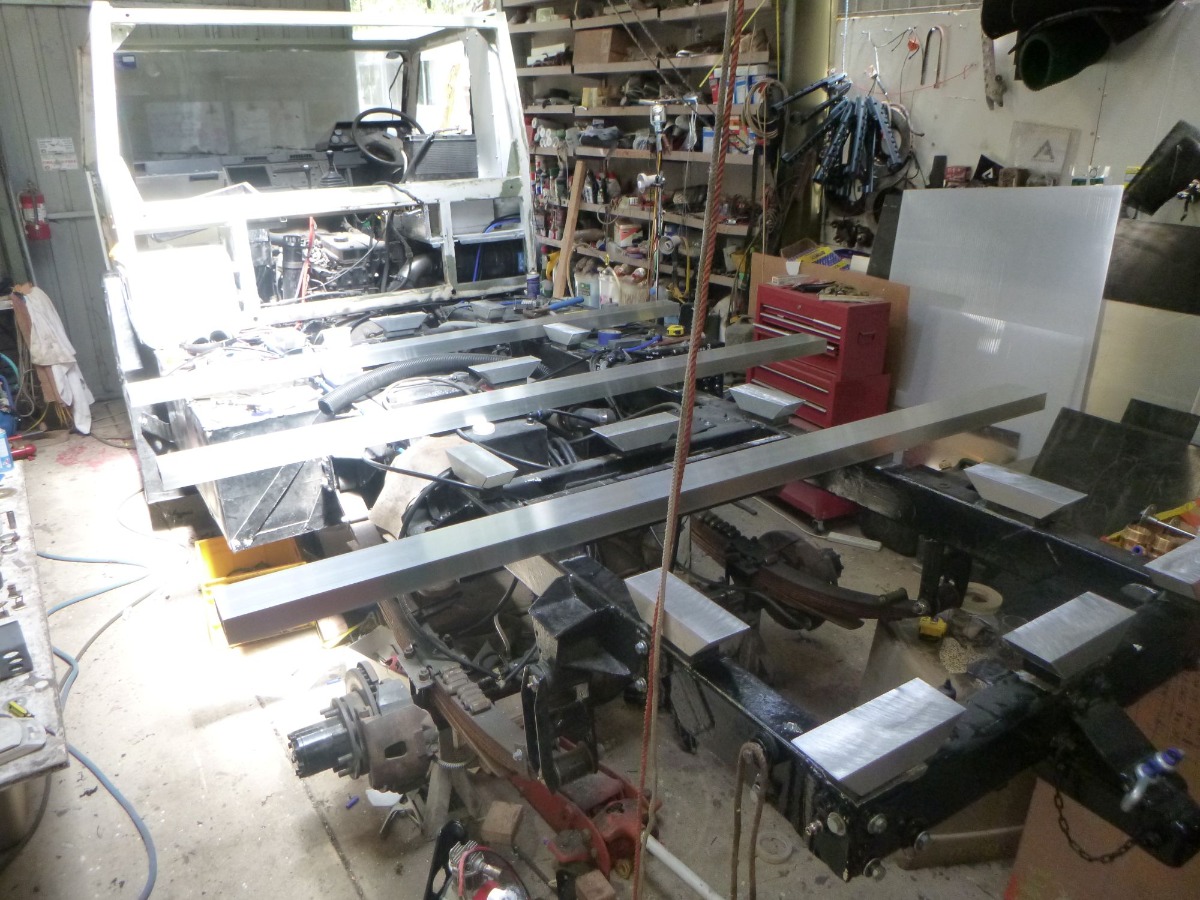
By attaching the floor to the chassis as I have, there is a huge weight of bits of steel that I have removed from the chassis, in addition to the substantial savings in the sub frame.
The floor is glued to the top of all those bits of aluminium.
The floor is the same thickness as the other panels but uses a foamed PET core instead of closed cell polyurethane. It is a tad heavier, but has better compression strength and is less likely to crush under foot.
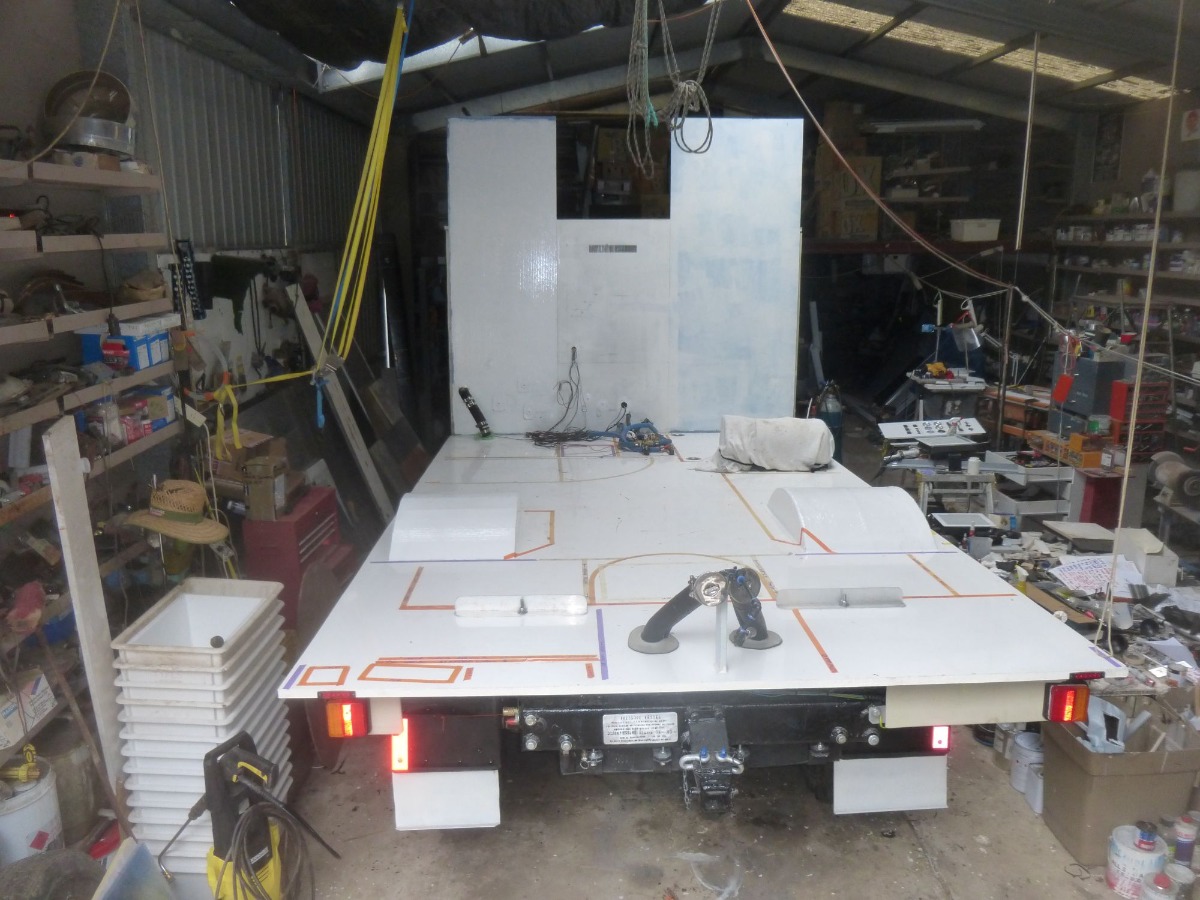
As pictured above, the whole rig still weighs a tad less than 3T (including the 4 off 323/85R16 wheels and tyres).
More later......
Cheers, Peter.
OKA196 motorhome built 2004/5, tinyurl.com/OKA196xtMotorhome
OKA 077 lightweight motorhome under construction.
Mob.0428171214
Please Log in or Create an account to join the conversation.
- Peter_n_Margaret
-
- Offline
- Posts: 910
The glue used to attach the polyurethane blocks to the chassis and the aluminium was Plexus MA310 2 pack. Expensive & spectacular.
I expected to have some issues with doing this with the engineer. As it turned out he was not concerned at all. The important part for him was that if it failed, the box would not fall off onto the road.
That was easily accomplished with a couple of "safety straps" at the rear.
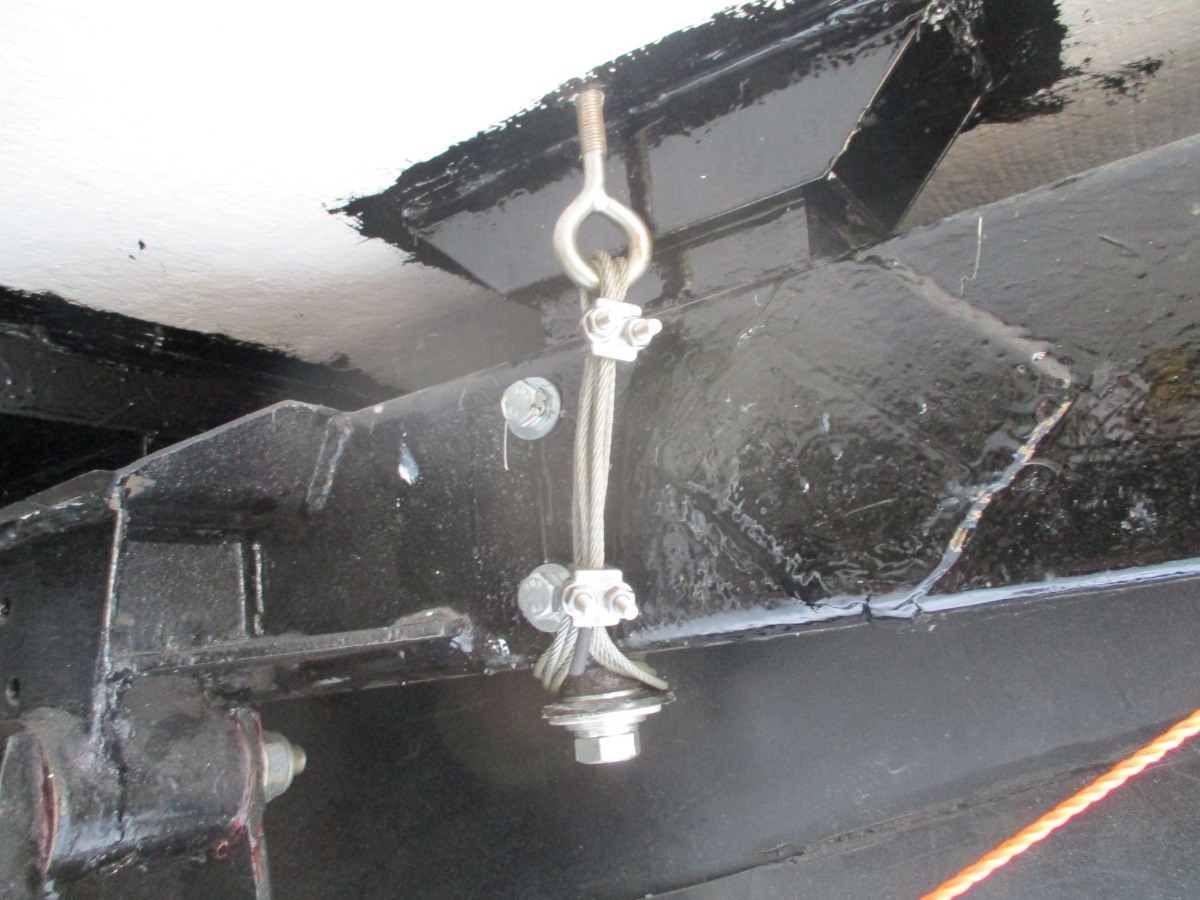
This also shows the polyurethane blocks on the chassis.
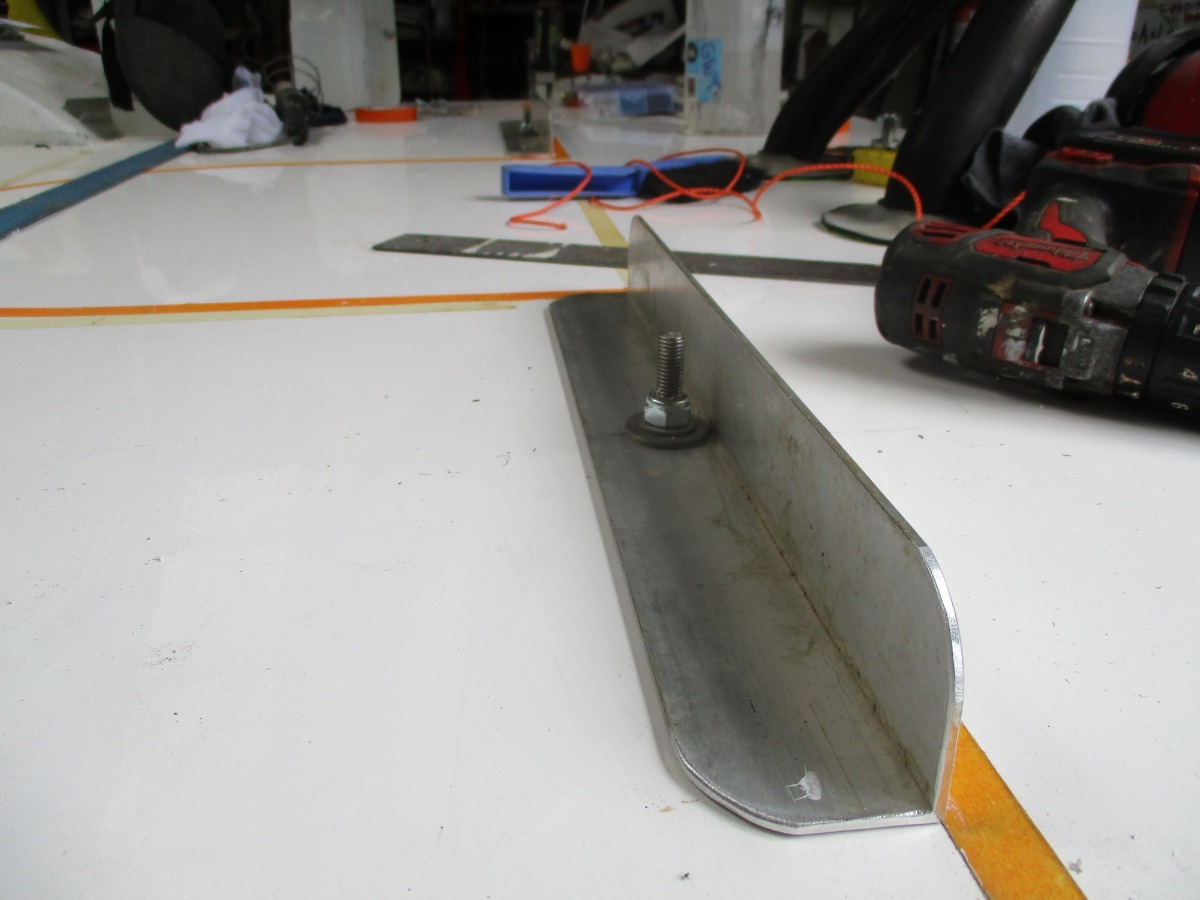
2 safeties, each attached to a piece of aluminium angle above the floor, inside a storage box.
Cheers, Peter.
OKA196 motorhome built 2004/5, tinyurl.com/OKA196xtMotorhome
OKA 077 lightweight motorhome under construction.
Mob.0428171214
Please Log in or Create an account to join the conversation.
- Peter_n_Margaret
-
- Offline
- Posts: 910
#196, all the furniture was built from the same sandwich panel as the box, using the off-cuts.
Very strong, gel coat finish one side, 2 pack paint the other side, all glued, no mechanical fasteners except for the piano hinges on doors etc. that used all aluminium pop rivets (which limit the pull-up pressure so less likely to pull through the FRP skin).
Toilet/shower floor was a custom made fibreglass floor with a slope to a central drain. Despite what I thought was a 'generous' drain, we often park on slopes that exceed it, which is a pain. #077 is different

#077 is using very different material for furniture.
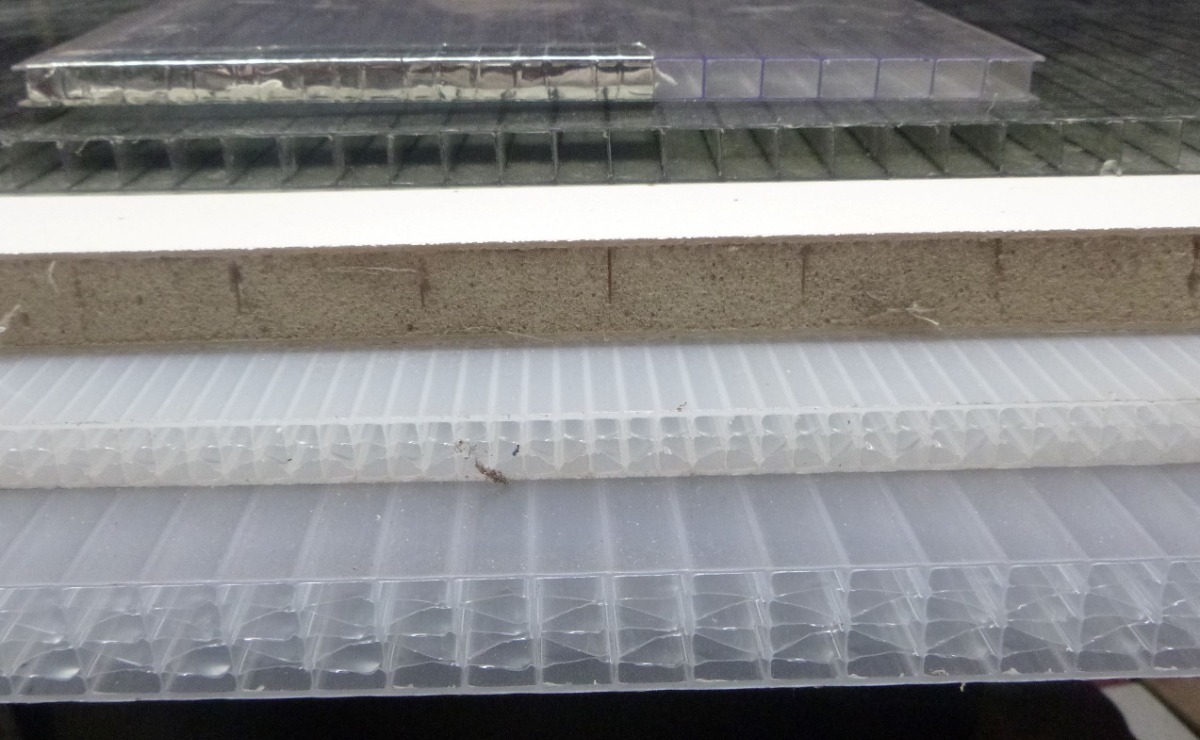
From the top down....
Top 2,. 10mm double wall polycarbonate roofing. 1.7kg/m2.
#3 23mm Vanglas sandwich panel, 20mm closed cell polyurethane foam and 1.5mm FRP skins. No gel coat on 'back' 6.1kg/m2
( Floor as above but with PET foam, 6.9kg/m2, Roof will be as above with 34mm foam for improved insulation under the solar panels)
#4 10mm multi-walled polycarbonate roofing. 2.6kg/m2.
#5 18mm multi walled polycarbonate roofing, 3.11kg/m2.
Most of the furniture will be the 10mm double wall material @ 1.7kg/m2.
I have developed a few tricks for bending, painting and gluing this stuff and it will good for 90% of the interior.
All glued joints are easily reinforced with a light weight plastic angle piece where required.
The big vertical panels at the back of the cab in an earlier pic are the 18mm PC with an FRP skin glued to the outer faces that are external.
This is quite expensive stuff, but I found an Israeli manufacturer with a warehouse in Adelaide and I have almost enough in reject and off-cuts to finish the fit-out for the price of a few slabs of fancy beer.
Shower floor is simply the flat gel coated floor of the box. Instead of adding another custom made floor to try and get the water to a single drain point, I did this..... one drain in each corner - any slope accommodated
The grey water tank is immediately under the shower and the drains hoses are just 12mm. One drain hose is silicone hose as it gets a bit close to the exhaust. The drains have sink style filters and shut-offs to catch hair etc.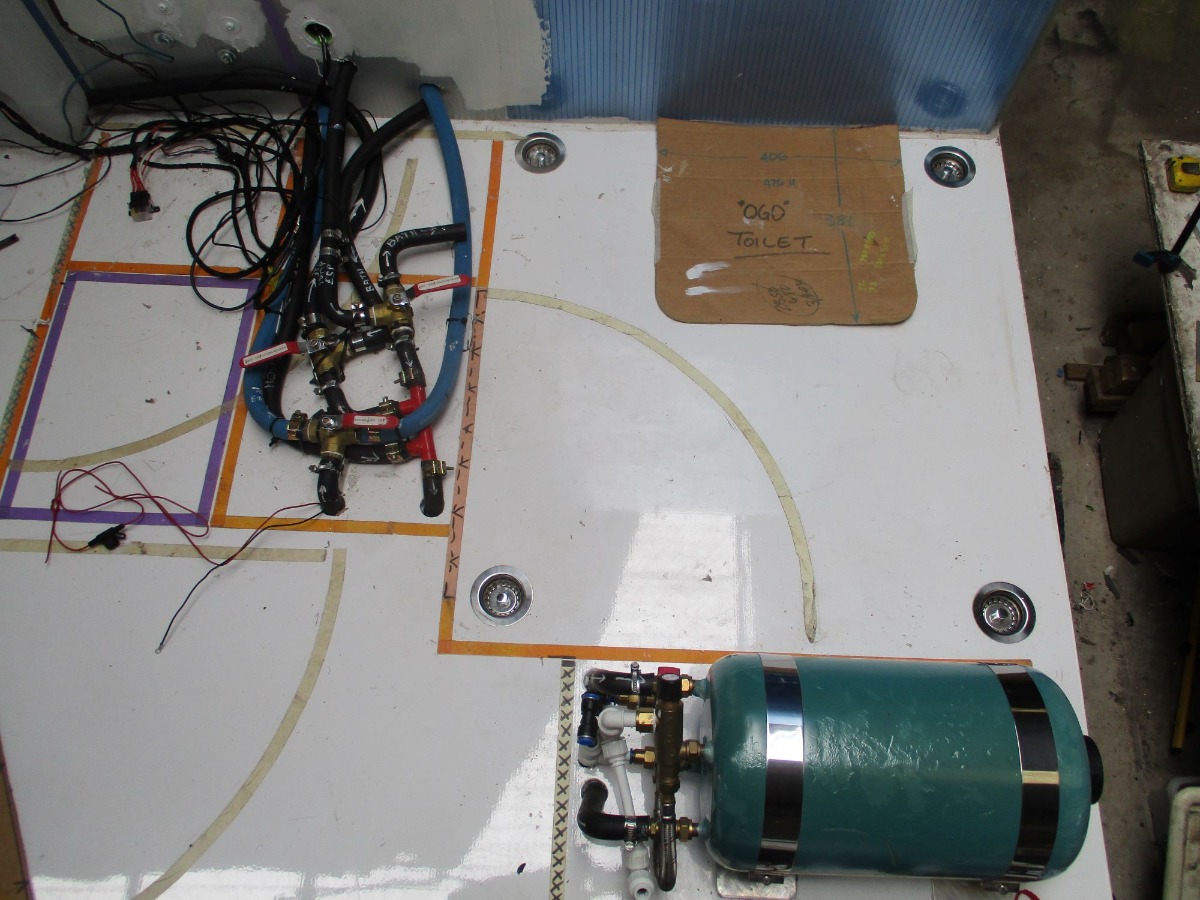
Cheers, Peter.
OKA196 motorhome built 2004/5, tinyurl.com/OKA196xtMotorhome
OKA 077 lightweight motorhome under construction.
Mob.0428171214
Please Log in or Create an account to join the conversation.
- Peter_n_Margaret
-
- Offline
- Posts: 910
Domestic 220V AC inverter fridge/freezer about 200L.
OGO composting toilet (see cardboard cut out on shower floor of earlier pic).
Diesel heater Eberspacher D5E HS3. Hydronic, expensive, brilliant.
We have had a Webasto version in #196 for some years. It circulates hot glycol to the HWS calorifier (heat exchanger) and to 2 glycol to air radiator/blower units, one for the bathroom and one for the living area. The one for #077 will be similar.
They are also connected to the engine, so drive 30 minutes and the HWS is hot, or run the diesel heater on a cold morning and pre-heat the engine. They can also be heated with 220V and 1000W from the solar/inverter.
The diesel heater itself is tucked into the back LHS of the engine compartment. There is a fair bit of plumbing to hook it all together, but the result is a completely versatile and brilliant product. You can see some of it again in that toilet/shower pic earlier.
The calorifier is that tank in the foreground of the same pic. In #196 I used a 30L calorifier. Due to weight reduction and heating speed (which is fast), I fitted #077 with a 10L calorifier. It is right next to the shower and immediately underneath the kitchen sink. No wasted hot water. I am sure that it will supply hot water at a rate sufficient to provide (almost?) continuous showers if required.
When driving, the hot glycol can be circulated via the radiator to the bathroom, with the bathroom door closed and with a sliding window in the bathroom slightly open, we can heat the bathroom without heating the rest of the interior and we have a very effective cloths drying room, all using waste heat from the engine.
These are the DIY heat exchanger/blowers. I did not like any of the commercial ones because they were all too noisy. #196 has similar except no PWM speed control and slower fans.

Custom made single core radiators, very quiet 120mm high speed fans with PWM speed control.
I have not yet decided if I will initially install one, but I am planning for a 2.5kW, cool only, domestic split refrigerated air conditioner.
As of now, the favorite is a Fujitsu ASTH09CNCA based on weigh (25kg + 8kg) and physical size. The outdoor unit would be in a rear storage box, on runners to slide out when in use. The indoor unit would be above the rear window.
Cheers, Peter.
OKA196 motorhome built 2004/5, tinyurl.com/OKA196xtMotorhome
OKA 077 lightweight motorhome under construction.
Mob.0428171214
Please Log in or Create an account to join the conversation.
- mat-with-one-t
-
Topic Author
- Offline
- Posts: 43
Now you know I won't stop annoying you there!! I would just ring you, but I imagine this stuff is really useful for many others on this site (and elsewhere)!
- so the next part - walls and roof. Could you please briefly talk about how that goes together without a frame?
- pro's and cons of using some sort of aluminium framing for this style of build?
- Did you make any specific frames for the door or any windows/openings, or are the panels inherantly strong enough?
- I am looking at various options for a pop top (aware that it invites potential cost/complexity/problems). How might you see one working with this sort of construction approach?
- where is your Engineer based? How do you go about making sure the right engineer is involved to ensure it will all get signed off?
- Given I am hopefully installing seating for three near the front of the camper body, I assume I will need to pre-plan a sub-floor crossmember that will be rated sufficiently to bolt these in?
- would a crawl-through from the cab be achievable with this sort of camper body design?
Cheers! Thank you so much.
Mat
Please Log in or Create an account to join the conversation.
- Peter_n_Margaret
-
- Offline
- Posts: 910
This is what I will do on #077.
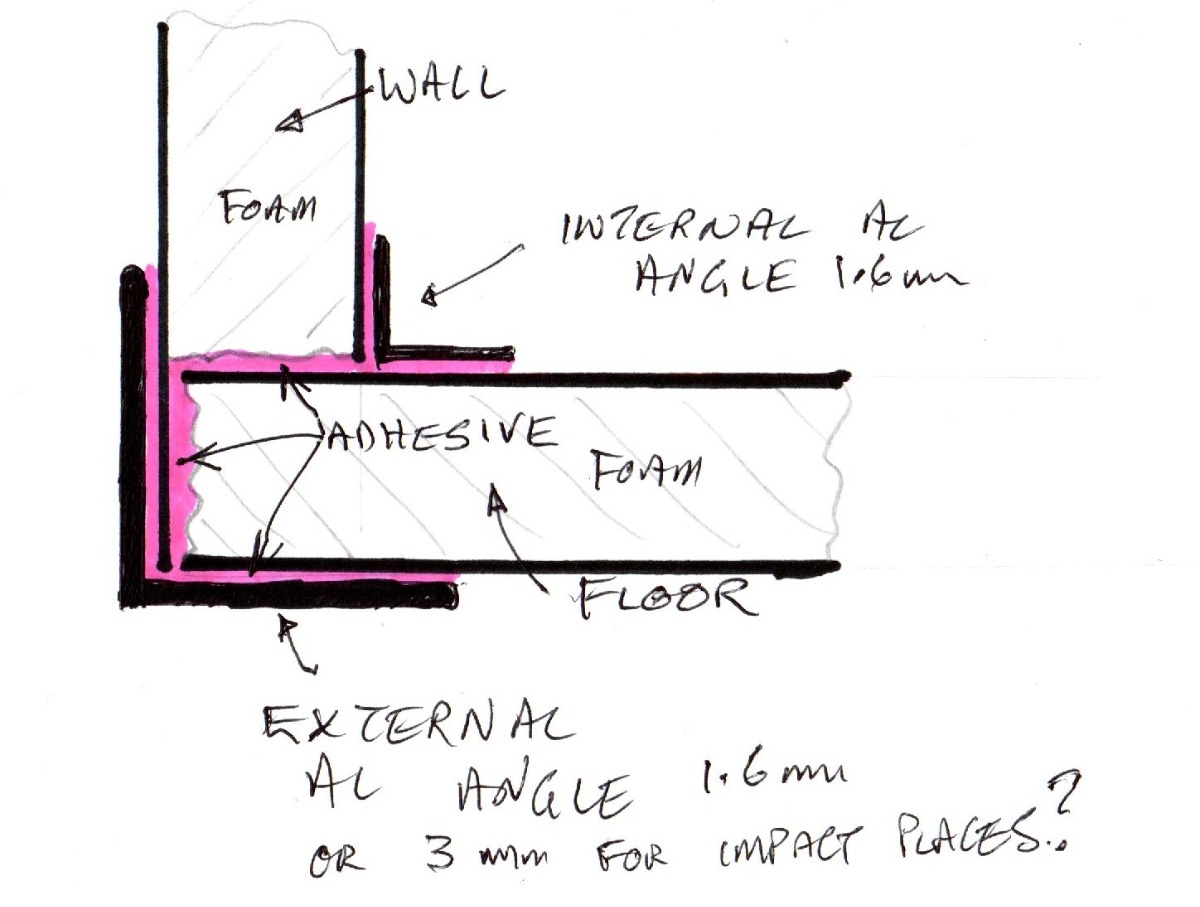
Should be self explanatory?
Getting glue strength is about good quality prep, good adhesion and high surface area.
There are still traps.
There is a differential expansion between the sandwich panel and the extrusion. You need to know what that is and what elongation-before break that your selected glue can accommodate. Having the glue joint too thin for its elongation capability will cause it to tear and fail. The message is to make glue joints between dissimilar materials THICKER.
I had some on #196 that needed to be 4mm thick when using Sikaflex252 which is a higher tensile material. Lower tensile grades can often be thinner.
The inside extrusion can usually be in relatively short sections to overcome this problem.
Sikaflex make the premium products, in my view, but they are also very expensive, compared to many others.
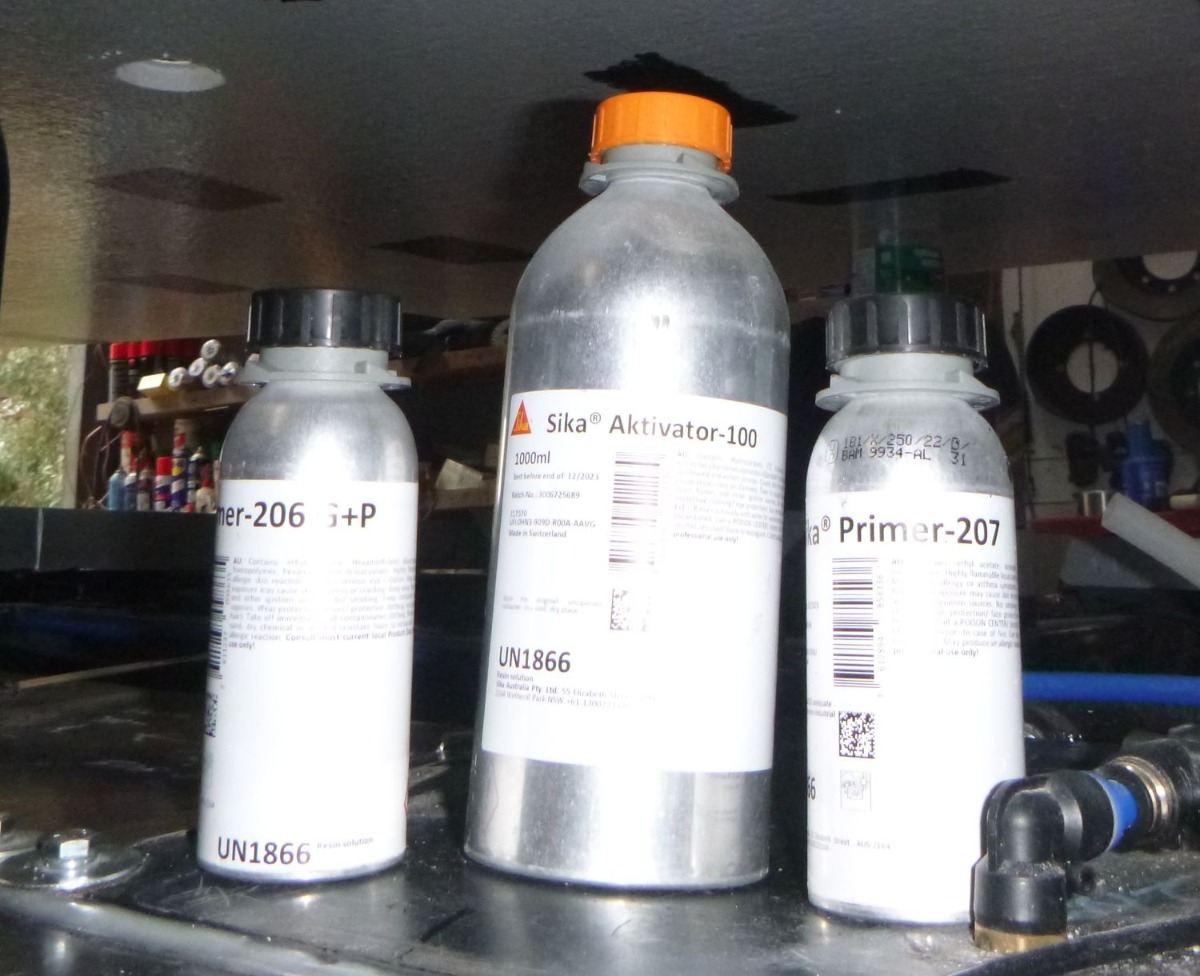
For #077, I am using Wurth Bond and Seal. I think it is adequate for the structural jobs, if you do them well. Buy it by the box. You will (need to) use more than you think. These materials also have relatively short shelf lives. Check the primers/promotors at point of purchase.
Follow Sikaflex instructions and use the Sikaflex primers and adhesion promoters, even if you use some other brand of single pack polyurethane adhesive. Different surface materials need different treatments.
For internal furniture joins I use a 20x20 thin PVC 90 degree angle extrusion.
Cheers, Peter.
OKA196 motorhome built 2004/5, tinyurl.com/OKA196xtMotorhome
OKA 077 lightweight motorhome under construction.
Mob.0428171214
Please Log in or Create an account to join the conversation.
- Peter_n_Margaret
-
- Offline
- Posts: 910
Often, I will use small patches of double sided self adhesive foam tape folded to be the target thickness.
Appl LOTS of adhesive, press the parts together over the tape and the tape will help to hold the parts in the right place as it goes off.
pps... The join between the main panels that I suggest above avoids any "cold connections" where a metal component that is outside can cause serious condensation if it is also inside.
Cheers, Peter.
OKA196 motorhome built 2004/5, tinyurl.com/OKA196xtMotorhome
OKA 077 lightweight motorhome under construction.
Mob.0428171214
Please Log in or Create an account to join the conversation.
- Peter_n_Margaret
-
- Offline
- Posts: 910
Not needed, unnecessary expense, will cause additional differential expansion issues.
This is slightly thinner panel used on #196.
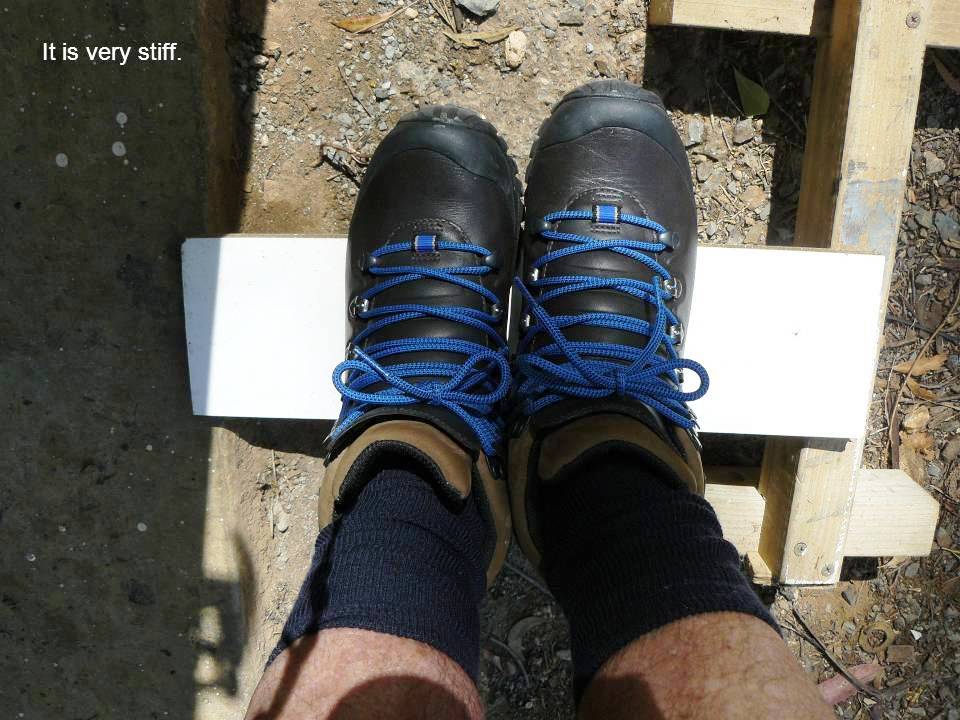
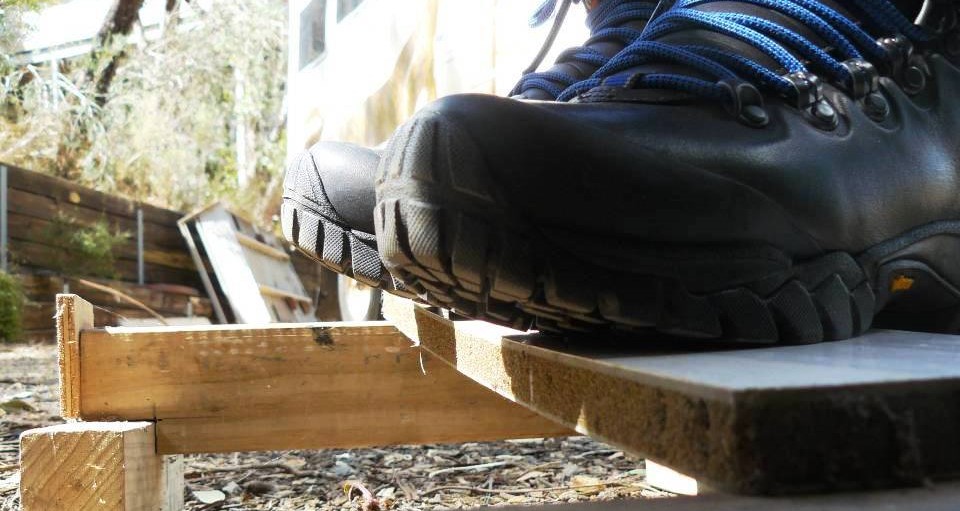
Cheers, Peter.
OKA196 motorhome built 2004/5, tinyurl.com/OKA196xtMotorhome
OKA 077 lightweight motorhome under construction.
Mob.0428171214
Please Log in or Create an account to join the conversation.
- Peter_n_Margaret
-
- Offline
- Posts: 910
Did you make any specific frames for the door or any windows/openings, or are the panels inherantly strong enough?
The panels are inherently strong enough.
20 years ago, I used the old Australite wind out windows in #196. I used to bust about 1 or 2 per year on trees until I reglazed them all with 3mm polycarbonate. No more breakages. Then a few years ago the vehicle rolled down a hill with no one on board and a couple got destroyed and replacements were not available any more, so I replaced the lot wit some locally made sliding windows. I don't like them.
With #077, I discovered that there is now a Chinese copy of the old Australite window available. There are some minor differences, but generally they are the same sizes and I have bought them. I have reglazed them all in 3mm scratch resistant polycarbonate, replacing the "bubble" acrylic.
Fitting them to the wall is a matter of cutting a hole, gluing them in, a little bog on the inside to make it clean and it is done.
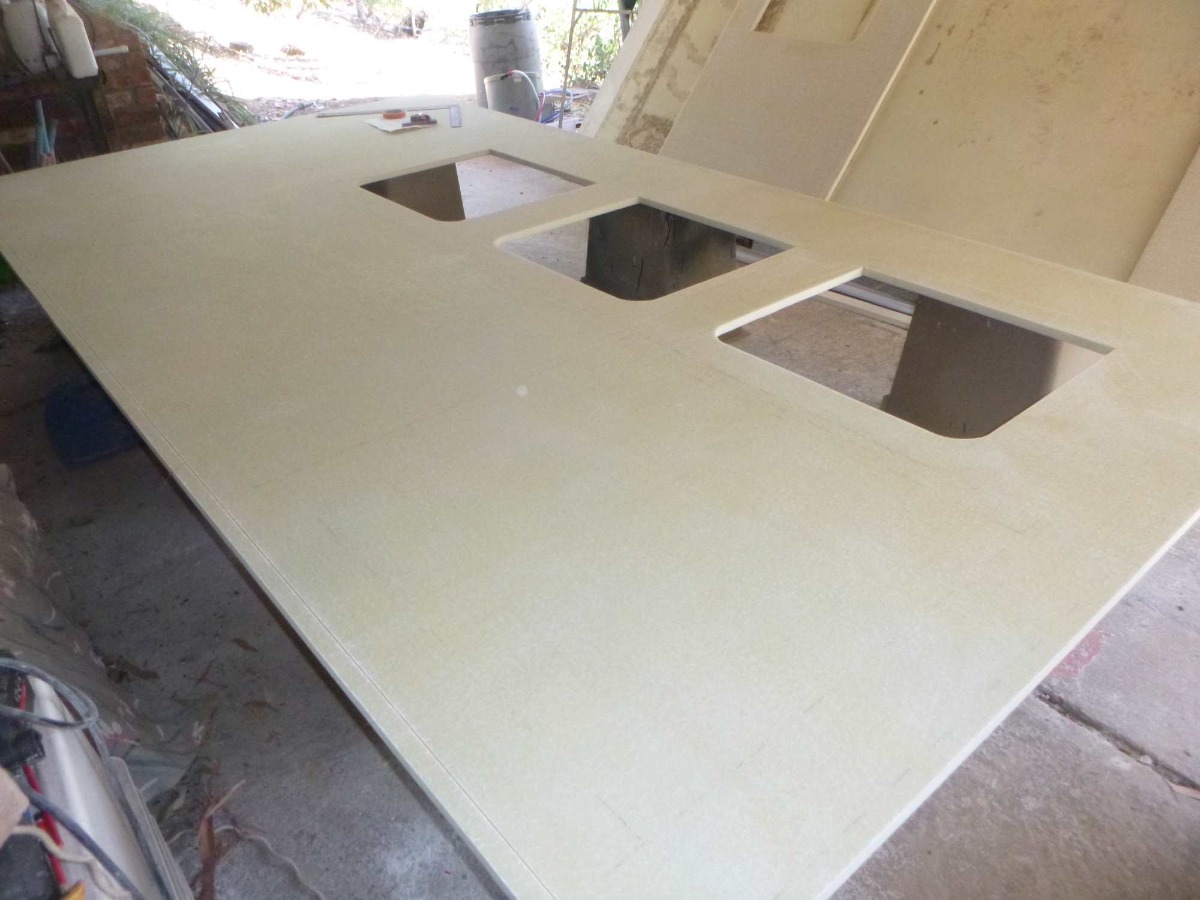
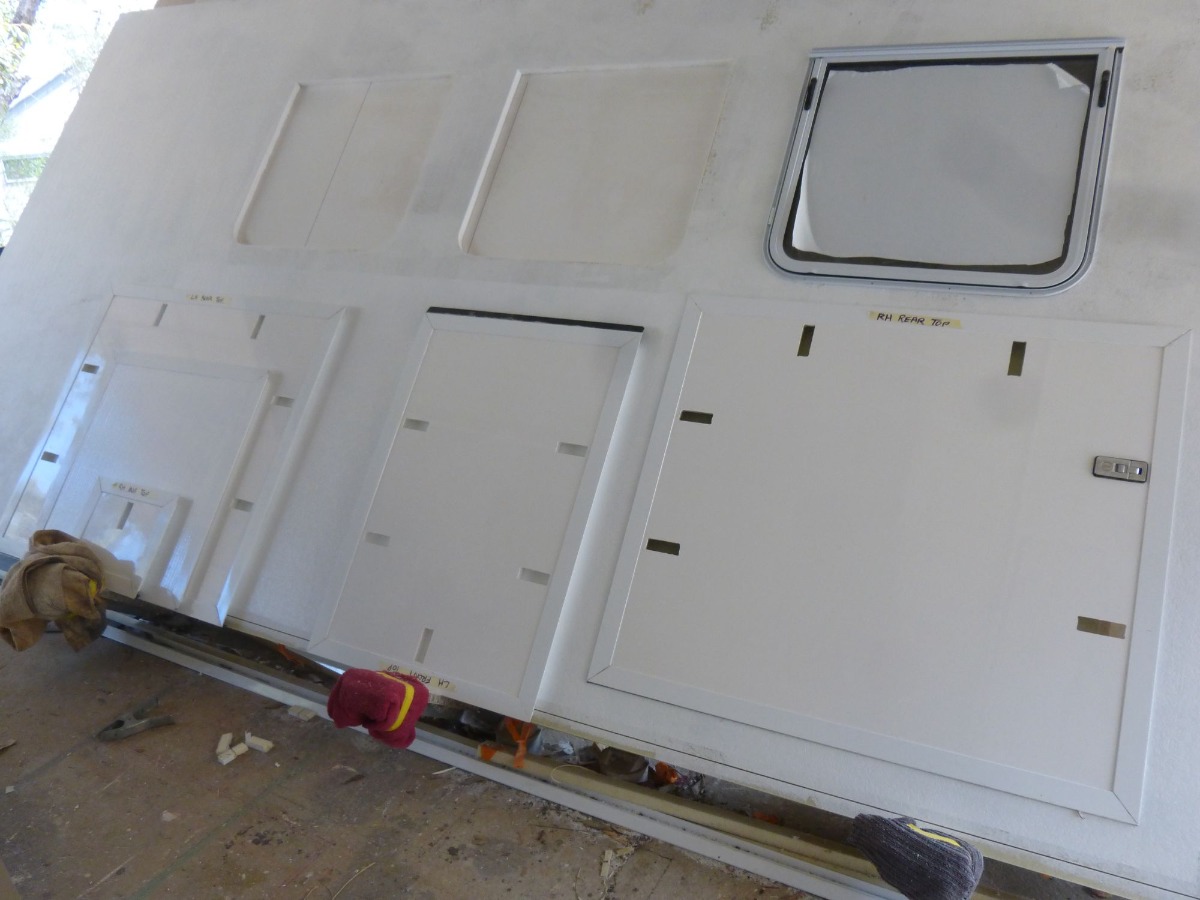
Side wall with 3 window cut-outs/
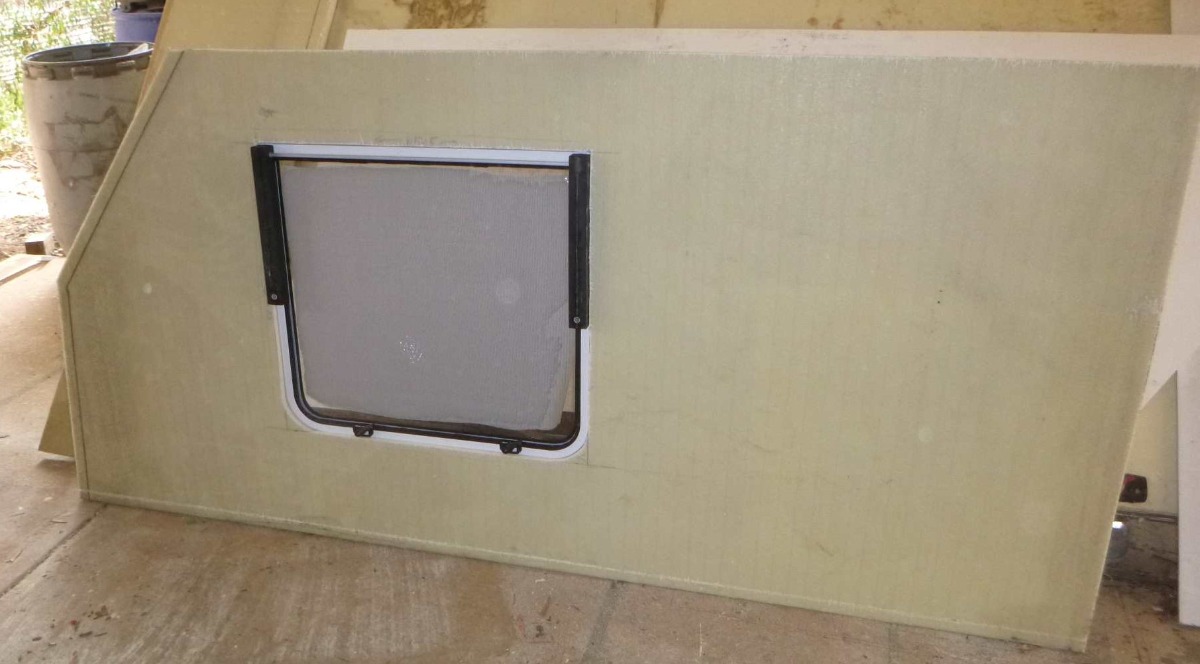
Outside of bed-over wall with window fitted.
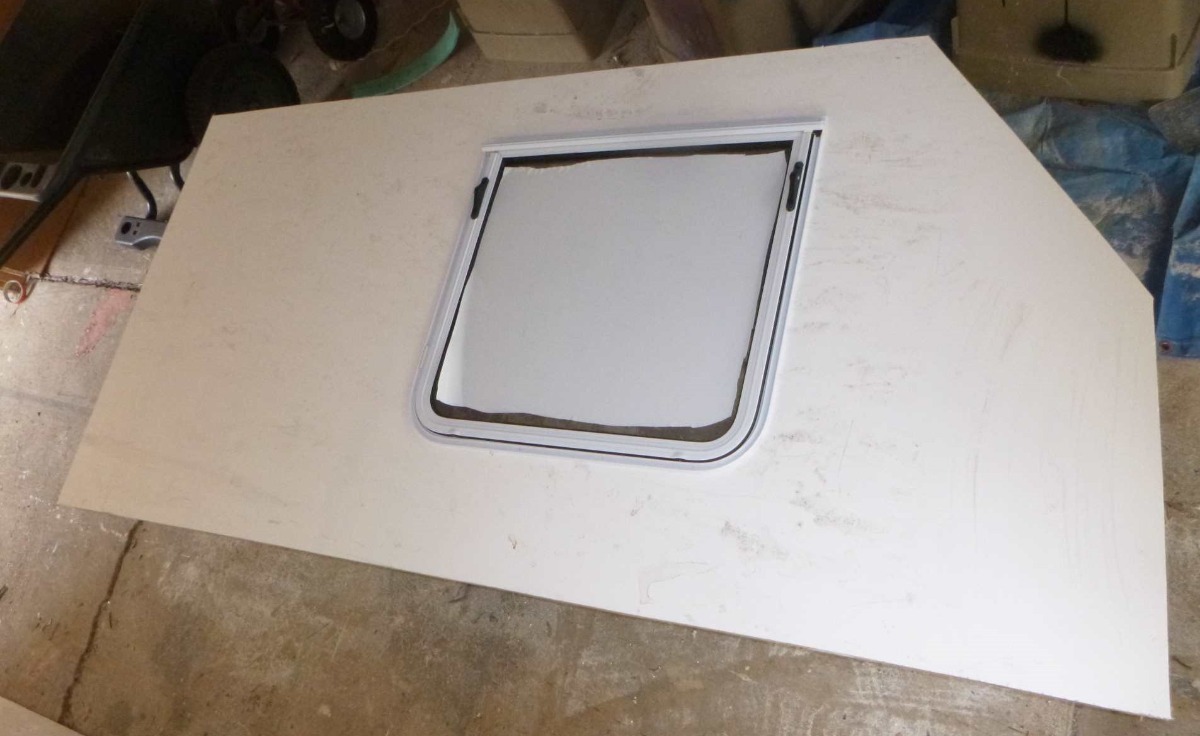
Inside of bed-over with window fitted (not glued-in yet, I won't do that until the walls are fitted).
I plan to make my own door for #077. Commercial doors are pretty crappy and quite expensive. It will be similar to a storage hatch.
With #196, I wanted to buy external hatches, but could not find the sizes I wanted and again, what was available was expensive, so I made my own and they have been quite simple to make, highly durable and cheap because they come from a hole cut out of a wall.
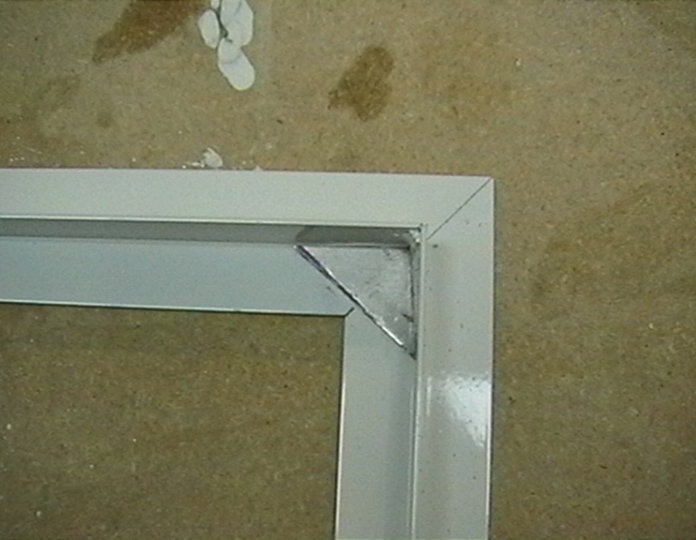
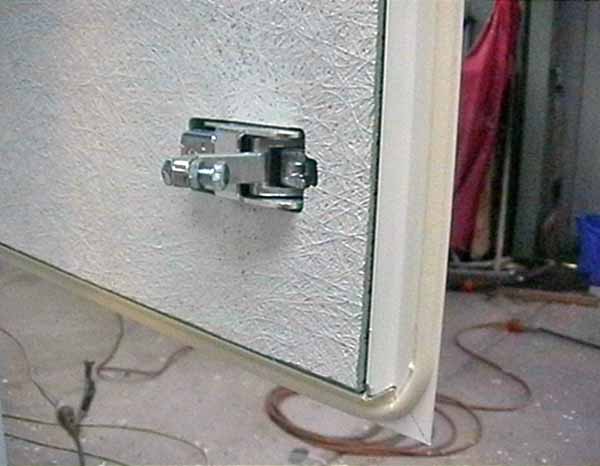
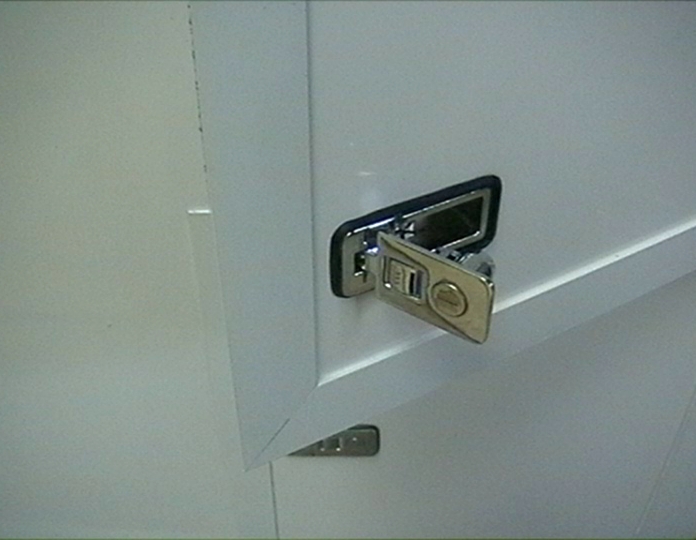
These are the basic steps....Pics are from 20 years ago.
1. Make a picture frame from 20x20x20mm powder coated aluminium "T" extrusion.
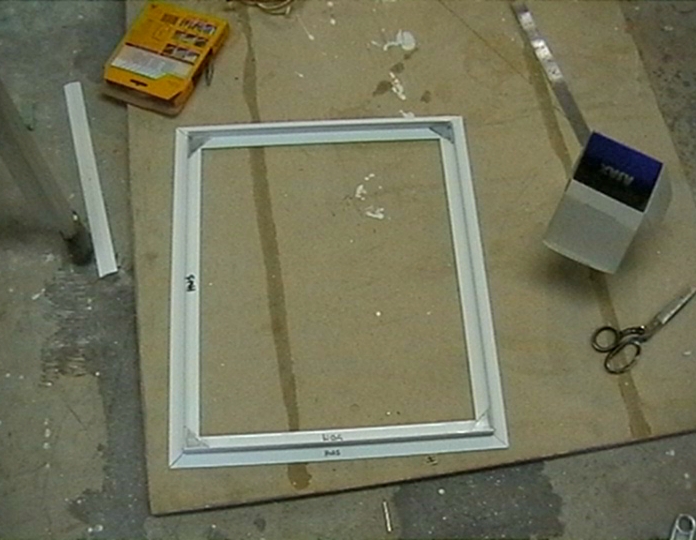
2. Reinforce the corners wit glued-in bits to hold it together while fitting the panel.
3. Cut out the holes for the latches and fit them and add a self adhesive seal.
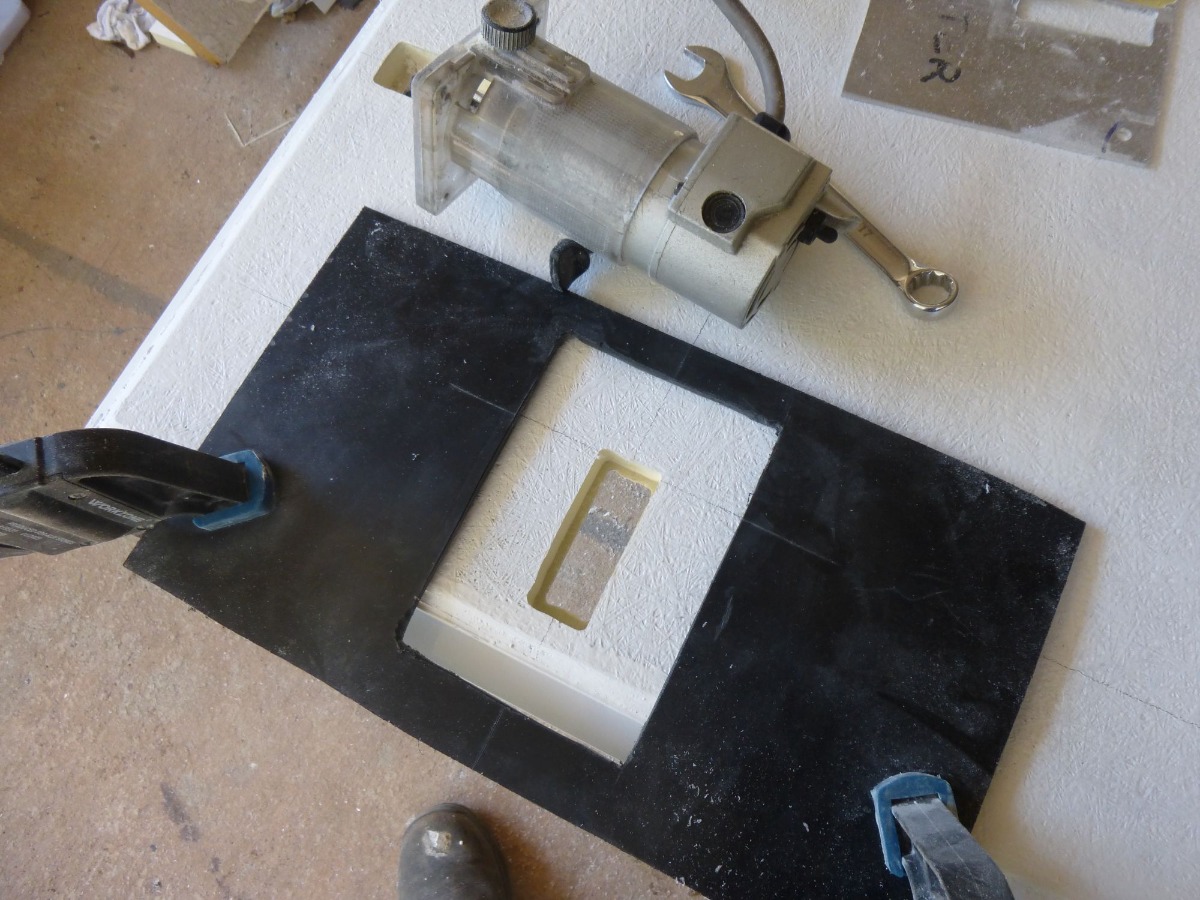
(3a. I did make a couple of router templates to cut the holes for the latches)
4. Add a piano hinge and attach to the wall.
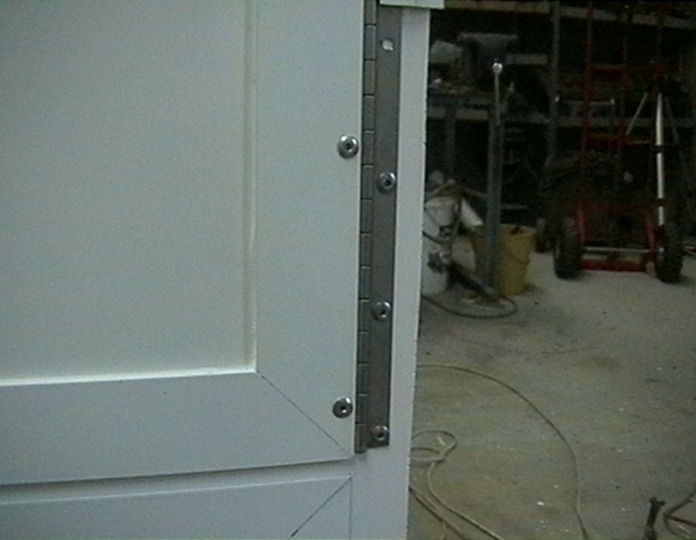
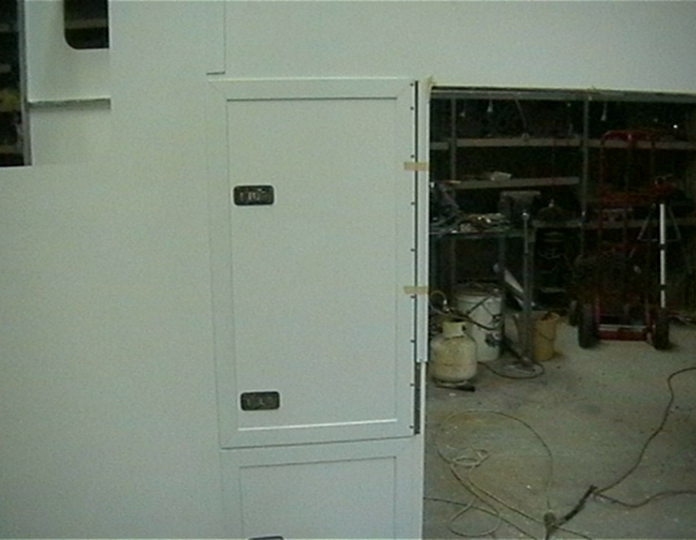
5. Bog up the gap inside between the panel and the frame and paint the inside.
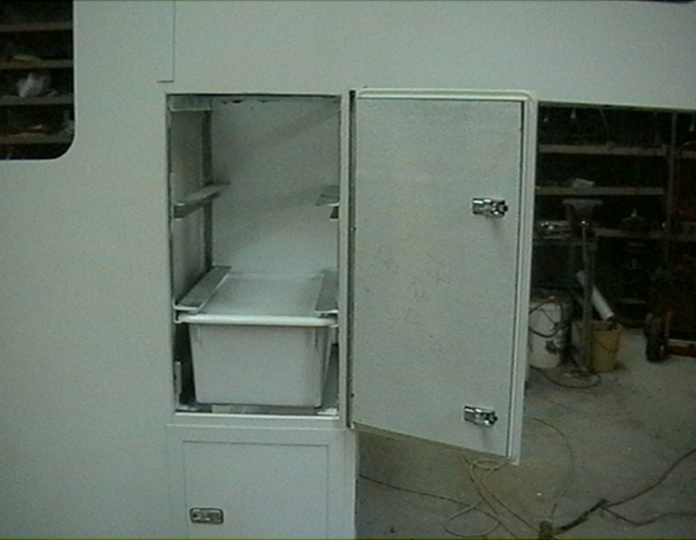
Not much has changed in the method since then.
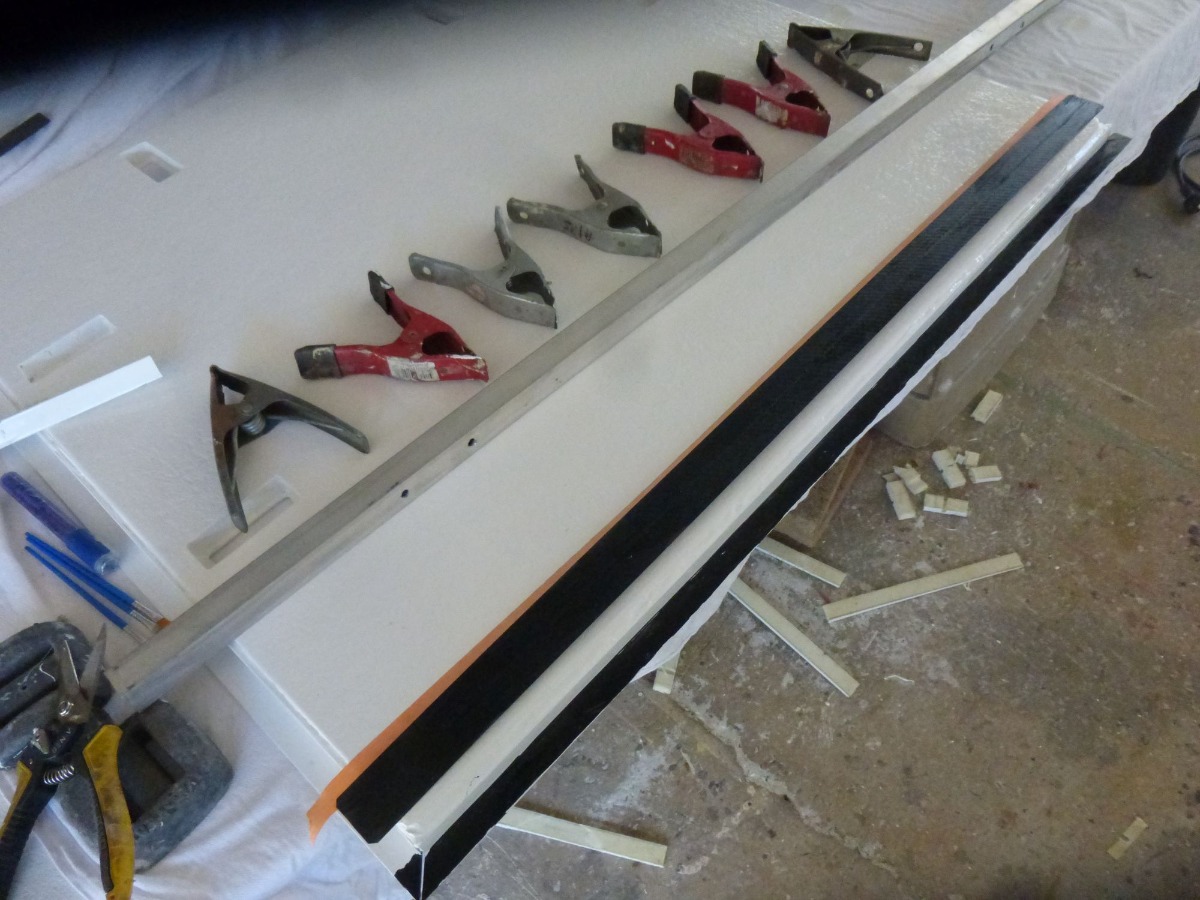
The most significant change for #077 is the hinges. I am using a carbon/kevlar piano hinge which is glued-on instead of the riveted S/S piano hinge. This is much quicker, lighter and it is dust and water proof. And it is much thinner which means it is closed when the hatch is closed so the exposed side does not need to be covered. Much neater.
Cheers, Peter.
OKA196 motorhome built 2004/5, tinyurl.com/OKA196xtMotorhome
OKA 077 lightweight motorhome under construction.
Mob.0428171214
Please Log in or Create an account to join the conversation.
- Peter_n_Margaret
-
- Offline
- Posts: 910
Not sure I can be much help here.
With #196, I used commercial pop-top aluminium extrusions. 6M lengths. Still have some left-over bits.
I would never do that again. Terrible "cold connection" condensation inside, and expensive.
If I did it again, I would fabricate the whole thing using left-over strips of sandwich panel for the edges instead of the extrusions.
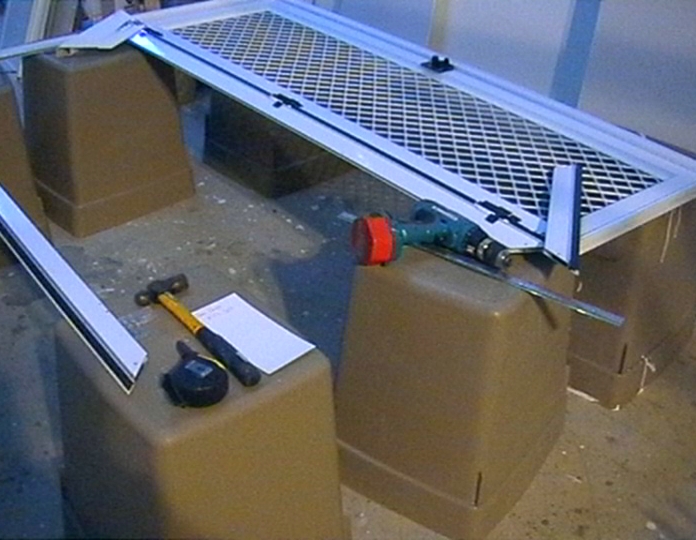
This is what I did.....
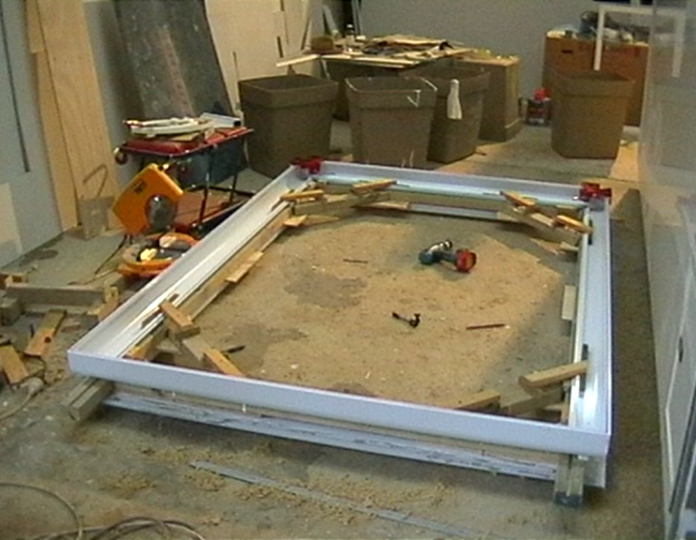
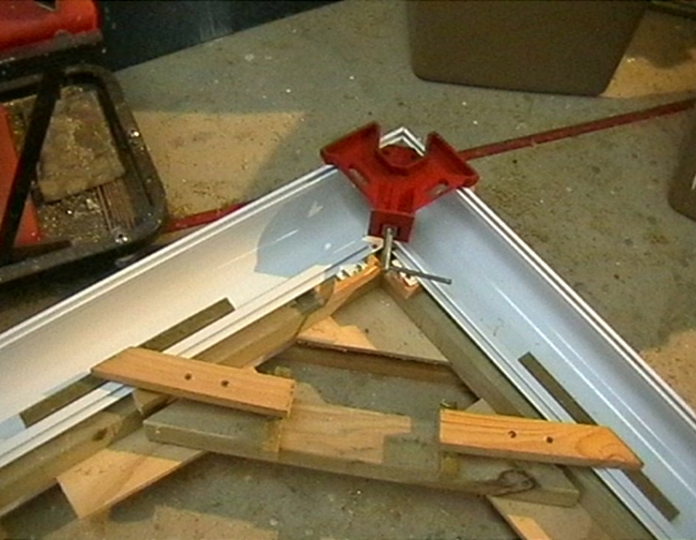
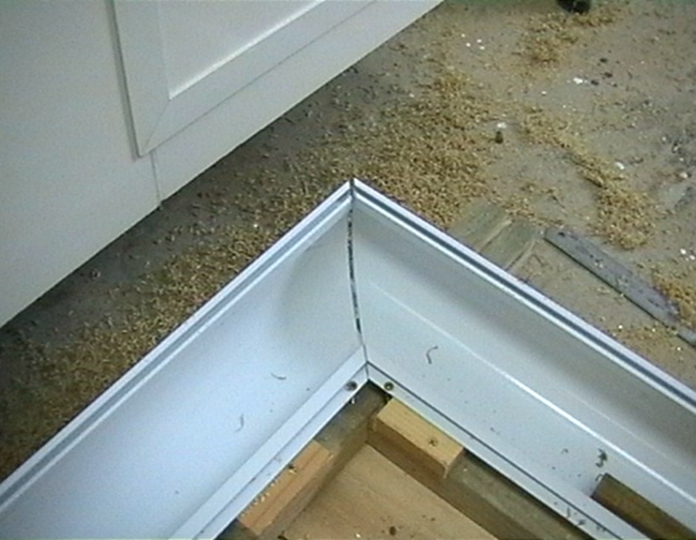
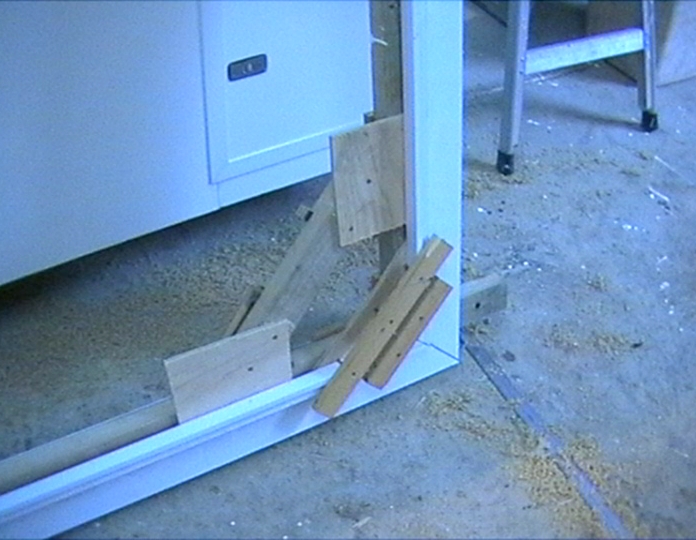
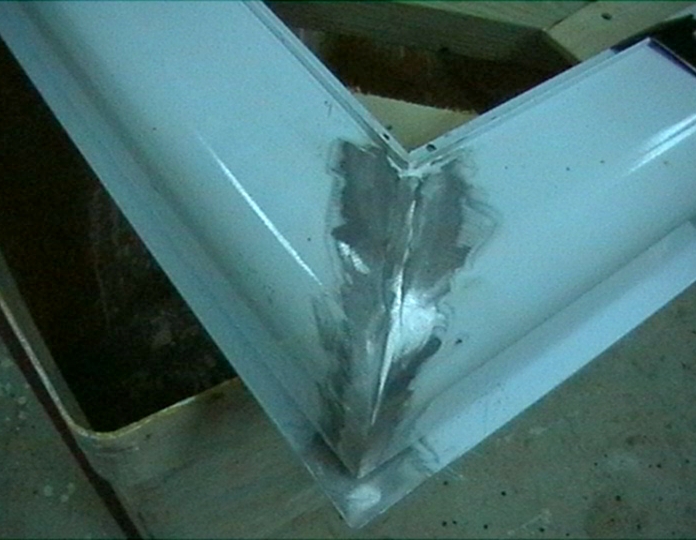
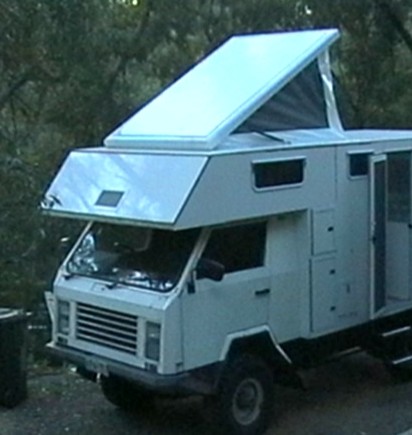
I had someone else weld the corners for me as my aluminium welding of thin material would be very sus. It is supported by 2 gas struts which work extremely well. easy to put up and down and lockable at a single point, all from the inside.
Cons:
Expensive vinyl section (with long zips and fly screens) needs replacing at about 12-15 years.
Noisy at night when the wind blows and the sides flap, despite being kept relatively tight by the gas struts.
Gas struts last 5-10 years.
Inside lock has been a water leak issue (currently fixed).
Insulation via the vinyl section is about zero (but not a problem in the cold with a good diesel heater).
Pros:
The hinged nature of the pop top means it is actually possible to stand on the bed at the rear (head) end.
The 3 very large hinged sections provide excellent ventilation.
And totally unexpected - The height and large ventilation area creates a thermal chimney that draws air in through the windows and out through the pop-top.
#077 will have a fixed roof section that is about 250mm higher than #196 and no pop top.
Everything is a compromise.
A full length pop-top will mean a lower vehicle but you will also loose the overhead storage facility.
This has been a winner in #196.
#077 will get a lighter weight version. This is a prototype.
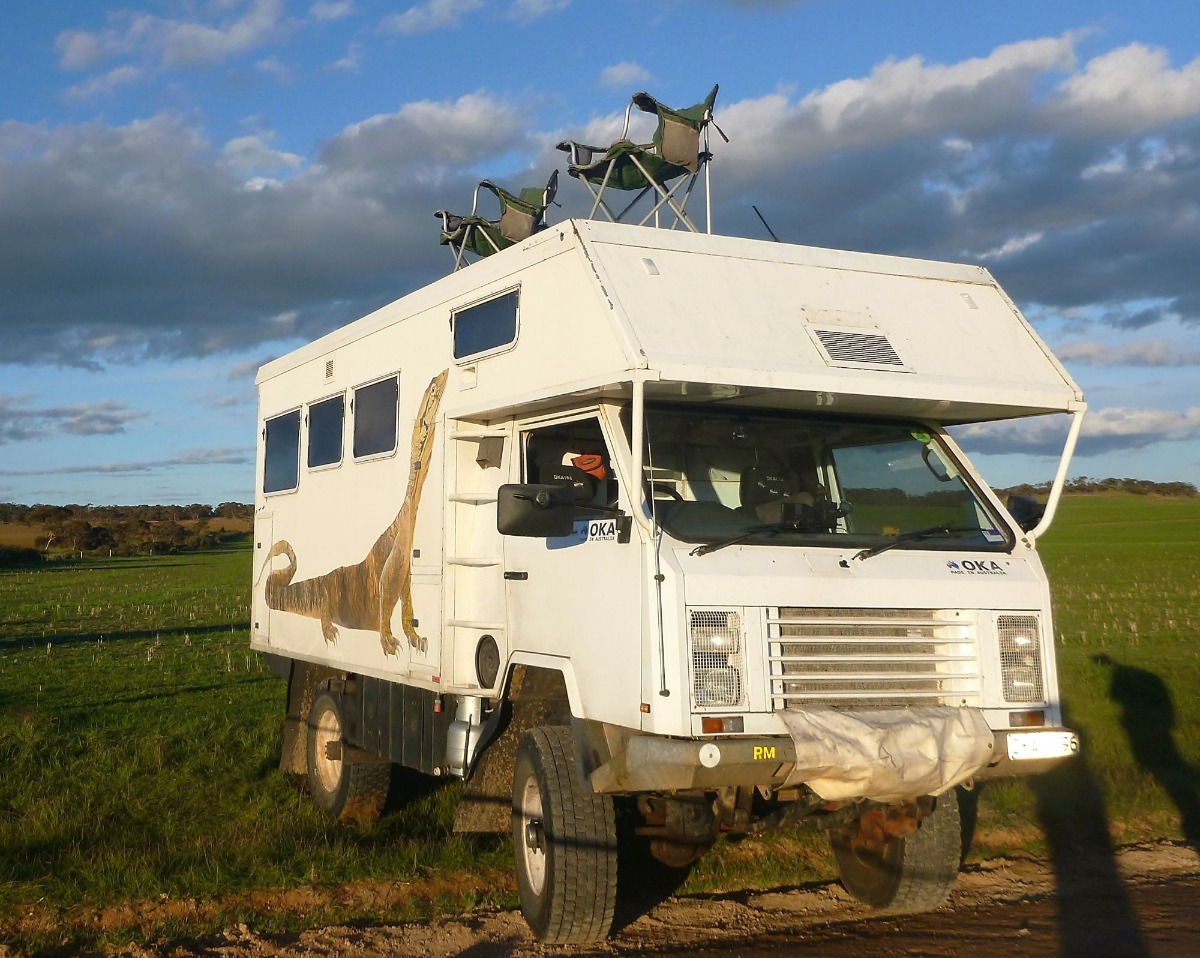
ps... the pop-top roof is strong enough to be an event viewing area.
We have had 6 people up there at any one time and no problems at all.
Cheers, Peter.
OKA196 motorhome built 2004/5, tinyurl.com/OKA196xtMotorhome
OKA 077 lightweight motorhome under construction.
Mob.0428171214
Please Log in or Create an account to join the conversation.
- Peter_n_Margaret
-
- Offline
- Posts: 910
My engineer is Douglass Potts in Adelaide. Each State has a list of engineers approved by the local transport authority who can approve this sort of stuff.
A good ongoing relationship with an engineer is pretty important.
I don't do anything too radical before talking to him on-site. That way, I hope to avoid too many expensive mistakes.
The other main advantage is they can approve something (if he can argue that it is safe) that is otherwise against the ADRs.
He once said to me "If you did everything strictly according to the rules, you would not need me."
For instance, we have an approved child seat mounting on the engine hatch between the front seats in the cab, and our sideways facing rear seats in the back have the fixed table between them which is not permitted according to the "rules".
Cheers, Peter.
OKA196 motorhome built 2004/5, tinyurl.com/OKA196xtMotorhome
OKA 077 lightweight motorhome under construction.
Mob.0428171214
Please Log in or Create an account to join the conversation.
- Peter_n_Margaret
-
- Offline
- Posts: 910
Custom approved seating is not as difficult as you might imagine, from my limited experience.
The seats themselves can be almost anything that you want to build. The strength requirements are mainly related to the mounting of seat belts and even that is not as onerous as you might expect.
Talk to your engineer early and tell him what you would like to do. I expect that a decent size plate (100 x 100mm??) under the sandwich panel floor for each end of each belt will be sufficient.
As soon as you have seats in the back though, there are lots of other rules such as no sharp projections, no loose objects or other things that might move about in a crash (like the fire extinguisher), no breakable things like glass mirrors, exhaust outlet must be behind the rear most openable window etc, etc.
You can find a fair bit of info using google and looking for the appropriate ADRs.
www.nhvr.gov.au/files/media/document/684...into-a-motorhome.pdf
roadtrek.com.au/navigating-adr-approval-...your-van-conversion/
Cheers, Peter.
OKA196 motorhome built 2004/5, tinyurl.com/OKA196xtMotorhome
OKA 077 lightweight motorhome under construction.
Mob.0428171214
Please Log in or Create an account to join the conversation.
- Peter_n_Margaret
-
- Offline
- Posts: 910
Absolutely.
#196 has a crawl through that goes through the wardrobe that is in the centre of the wall between the habitat and the cab. There is a door on each side of the wardrobe with latches that can be opened from either side.
It is really only intended for emergency use but without the wardrobe there, it could be a lot more "friendly".
My son originally had the rear seats (and the child seat mounts) approved in Queensland when he borrowed the OKA for a while. The engineer that he used wanted a temporary hole through that wall too that would allow verbal communications between the cab and those in the back. It was no problem and the wardrobe door was also clipped open when there were passengers in the back.
#077 will have some cupboards and steps up through that area, so a crawl through there won't work. Instead I will have a fairly large lift/push up hatch in the floor of the bed that will provide direct access to the cab, in either direction.
Cheers, Peter.
OKA196 motorhome built 2004/5, tinyurl.com/OKA196xtMotorhome
OKA 077 lightweight motorhome under construction.
Mob.0428171214
Please Log in or Create an account to join the conversation.
- Peter_n_Margaret
-
- Offline
- Posts: 910
I purchased 9 windows from Ozvan.
www.ozvan.com.au/caravan-window-aussie-t..._Paiz1kaAsteEALw_wcB
There were 8 @ 565 x 610mm (6 for use and 2 spares) plus 1 larger one that I have decided not to use (total 9).
Cost in 2023 was $2200 including freight
Cheers, Peter.
OKA196 motorhome built 2004/5, tinyurl.com/OKA196xtMotorhome
OKA 077 lightweight motorhome under construction.
Mob.0428171214
Please Log in or Create an account to join the conversation.